 Students
 Educators
New Item Types and Online Testing
updated 6/13/23
Item Types in TAG
IMPORTANT: Schools have the ability to create and enter assessment items using the interactive formats such as multi-select, inline choice and hot spot. These tests can be exported into TEKScore for Online Testing.
Any tests with the ONLINE ONLY distinction, cannot be printed or used for Plain Paper testing. This is due to the interactive capabilities. They can only be utilized with the online testing feature where students sign in to enter their answers.

To create test questions using the new formats, select ITEMS > New from the top navigation bar in TAG. Select the desired category from the left menu (hover over the boxes for a short description). Click on the box to create new items (e.g., Single Response, numeric, etc.).
After formatting and saving your question, you can attach it to standards and add related passages, graphics or key words.
Item Categories
Available item types are organized by categories in TAG. Each category contains one or more different types.
Click on the item title below for a video explaining how to create each one.
MULTIPLE CHOICE
Single Response
- Students select only one correct answer from a set of possible choices.
- Scoring: One point for each correct answer.
Multiple Response
- Students select one or more correct answers from a set of possible choices.
- Scoring: One point for each correct answer. Example: 3 correct answers equals 3 possible points. Students will only be able to select the maximum possible correct answers.
- Other Information: Maximum possible answer choices equals six.
True/False
- Students select either true or false.
- Scoring: One point for each correct answer.
Inline Choice
- Students select the correct answer(s) from one or more dropdown menu(s) that are in context with the surrounding text.
- Scoring: Each drop-down has one correct answer. Each drop-down equals one point.Other Information: Maximum drop-down choices equals six.
TEXT ENTRY
Short Text
- Students respond by typing a brief string of text such as a number, word, or phrase. The input will appear below the prompt.
- Scoring: One point for each correct answer. The correct response is scored by the software.
- Other Information: Best practice – limit the answer to as few words as possible for maximum accuracy in scoring. Input type can be text or number. Input width determines the length of the answer box the student sees in the item. Character limit is the maximum number of characters the student will be allowed to type. Check to box if the answer must be capitalized.
Inline Text
- Students respond by typing a brief string of text such as a number, word, or phrase. The input will be in context with the surrounding text.
- Scoring: One point for each correct answer. The correct response is scored by the software.
- Other Information: This type resembles “fill in the blank” items. Best practice – limit the answer to as few words as possible for maximum accuracy in scoring. Input type can be text or number. Input width determines the length of the answer box the student sees in the item. Character limit is the maximum number of characters the student will be allowed to type. Check to box if the answer must be capitalized.
Extended Text
- Students write an in-depth response by explaining, analyzing, and evaluating information provided in a reading selection or stimulus.
- Scoring: Rubric scoring 1-9. Teacher scored.
- Other Information: Predefined character limits of 475, 675, 1750, and 2350. Users will also be able to create a custom limit with a minimum of 100 and a maximum of 2350. When a rubric scoring guide is added, it will be viewed on the answer key.
Numeric
- Students respond with appropriate numbers in formatted boxes (formally ‘griddables’ in DMAC).
- Scoring: One point for each correct answer.Other Information: Numeric Response Format options include Grade 3, Grades 4-5, Grades 6-8, and High School Courses.
HIGHLIGHT & DRAWING
Hot Text
- Students cite evidence by selecting highlighted text in a sentence, paragraph, or extended reading.
- Scoring: One point for each correct answer. Multiple correct answers are optional.
- Other Information: Cannot highlight between paragraphs. Highlight in the template box to format text OR select text to be highlighted. Use the second box to select the correct answer(s). When students choose an answer, it will show as a darker shade of blue.
Hot Spot
- Students select one or more specific areas of a graphic.
- Scoring: One point for each correct answer. Multiple correct answers are optional.
- Other Information: The image size’s maximum height and width is 675 x 875. Images can be dragged and dropped into the item. Alternate text to be read to students must be entered. Choose between rectangles or circles. Clone shapes to make them identical and move to the desired spot on the graphic. Rectangles and circles can be drawn on the same image. Select correct answers individually or in batch mode. When students choose an answer, it will show as a darker shade of blue.
MATH
Equation Editor
- Students use an equation editor to enter their answer.
- Scoring: One point for each correct answer.
- Other Information: Student response must be an EXACT match to receive credit. Students can use a keyboard to record their answer. Students only have access to the keys on the equation editor when entering their answer.
Online Testing with TAG and TEKScore
The online testing feature is available to any school who purchases both the TAG and TEKScore applications. In this article, we’ll quickly take you through the whole process and discuss the six steps below.
- STEP 1: Creating a test in TAG and Exporting Key to TEKScore
- STEP 2: Setting up Test Key in TEKScore
- STEP 3: Enable Online Test and Testing Supports
- STEP 4: Students Access Online Tests
- STEP 5: Managing Online Sessions and Teacher-scored items (Rubrics)
- STEP 6: Teacher Dashboards – Real-time reports
STEP 1: Create Online Tests in TAG & Export Test Keys to TEKScore
- After you have created your test in TAG, you will need to export it into TEKScore and enable it so students can take it online. (Learn more about creating tests here).
- To the right of your desired test name, click on the Export icon from the Test > Search page in TAG.
- Select the option to “Copy key AND content” and check the box to review and approve online content. Next, decide if you want alternating or non-alternating answer choices. Online only tests default to non-alternating.
- Click Copy to open your test in TEKScore.

STEP 2: Set up Test Key in TEKScore
- Assign a grade and version number to your new Test Key in TEKScore–other areas on the page are optional. Click Save once you’ve made your selections.
- This completes the Header tab of your new Test Key. You can also make changes to the Content and Scoring tabs, as needed. The Key tab will be pre-populated with answers and tied to standards based on your TAG test.

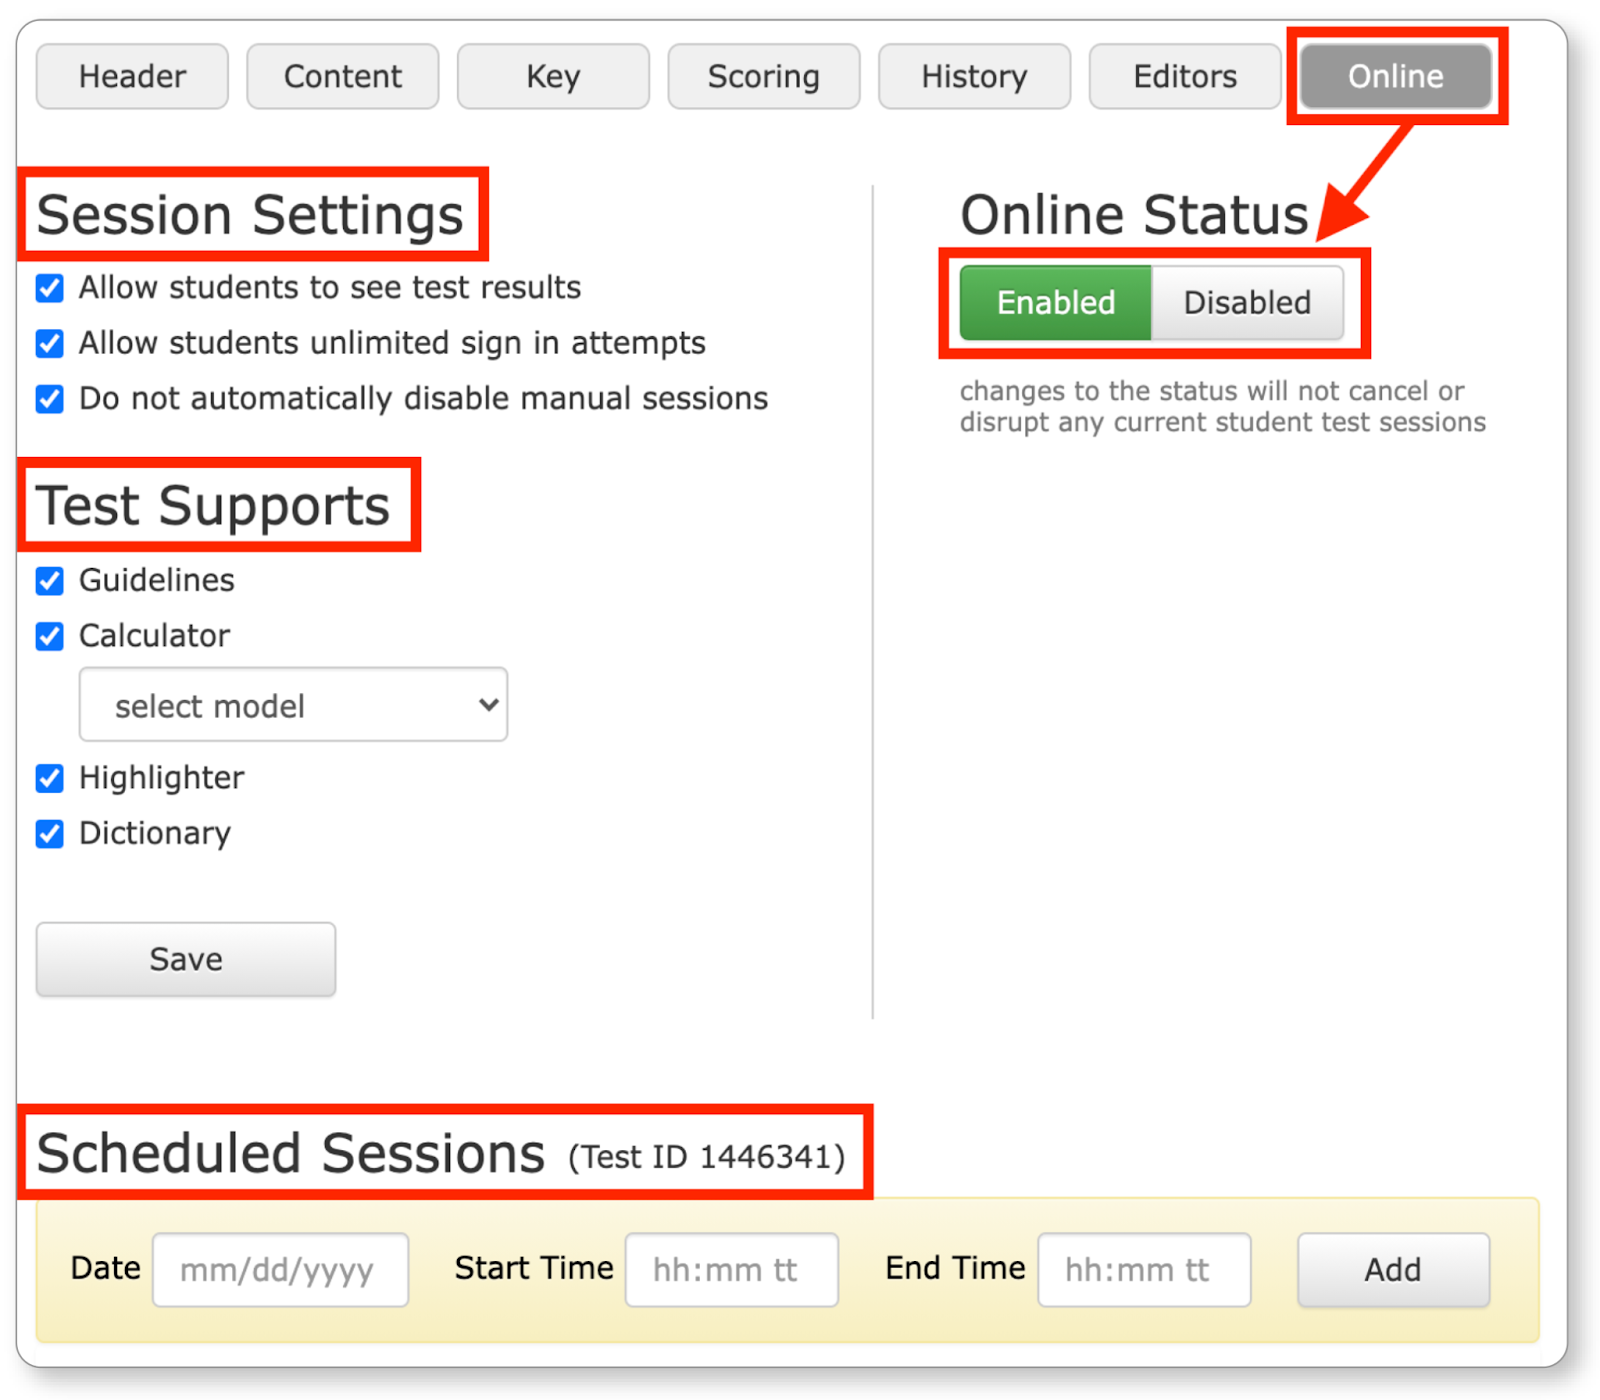
STEP 3: Enable Online Test and Testing Supports
- Move to the Online tab of your Test Key where you can click the Enabled button to activate your online test. Here you can also change your online settings or schedule online sessions.
Available Test Supports (for all students taking the test)
- Guidelines – Hover over and highlight one line of text at a time. Lock or unlock the position
- Calculator – Three models of calculators by Texas Instruments available for all grade levels
- Highlighter – Highlight individual words or phrases
- Dictionary – Search for the definition of a word
- Another way to activate online tests is from the Test Keys > List page (seen below).
- Click on the Student icon to turn on your test for online access. This will provide you with your Test ID.
- Click the Cancel icon at any time to deactivate your test. This can be done as many times as needed. Once created, your Test ID will remain the same for that test.

IMPORTANT: Individual Test Supports
Assign individual Online Testing Supports for students through DMAC’s Student Portfolio application. When assigned, this provides students access to features such as Text-to-Speech, Calculator and Content Language Supports while they are taking online tests.
Supports can be enabled for individual students or groups of students by using the Batch feature.
This step must be completed in Student Portfolio prior to a student signing in to take a test online. This feature is only available in Student Portfolio (given that it applies to individuals and not entire classes or grades).
- Open Student Portfolio and use the filters on the left to narrow down your list of students.
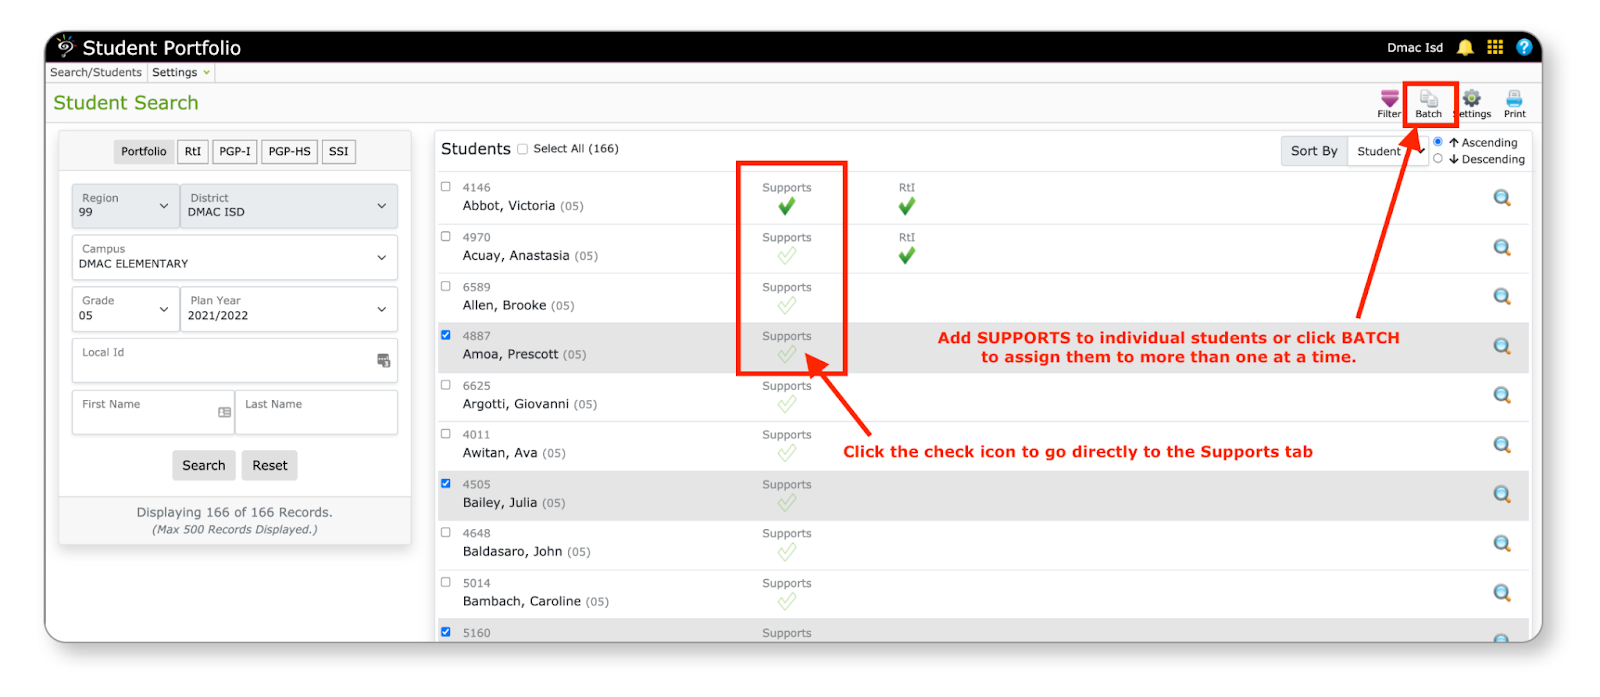
- To enable online testing supports for more than one student at a time, place a check mark next to the desired students (to the left of their names) or check the Select All box on the top of the column and click the Batch icon.

- To enable a support for an individual student, click on the Supports icon next to their name from the Student Portfolio Search screen. This will open the student’s individual portfolio on the Supports tab.
- Check the supports you want to enable by subject and click the save button.

- From the Student Search screen in Student Portfolio, students with active supports will have a green check icon in the Supports column. Hover over the icon to see the number of supports assigned.

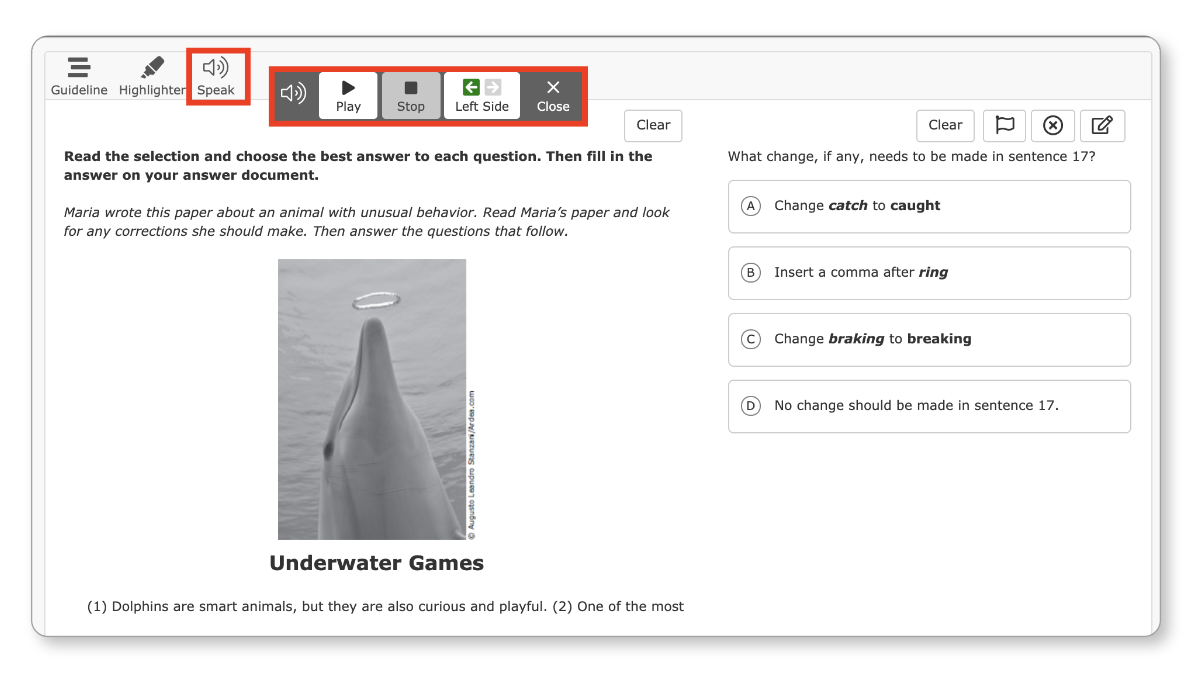
- Once enabled, a student will see the online testing supports while taking tests. The example below shows the Speak icon on an ELAR test. Students can click on the icon to open the controls, which allow them to start and stop audio to read the text on the screen.
STEP 4: Students Sign in and Take Their Tests
- Students will need their Local ID, birthdate and Test ID to sign in and complete their test online.
- Access the Student icon on the DMAC homepage at https://www.dmac-solutions.net or sign in at https://apps.dmac-solutions.net/student/
- To print a list of Local IDs and birthdates, teachers can access Utilities > My Account (seen below).
- Click the Print or Export icons for all assigned students or by individual classes.

- After signing in, students select their teacher, class, and semester and then start their test.
- Active testing supports will appear on the top left corner of the screen under the test name (e.g., Guideline, Calculator, Highlighter, Text-to-Speech and Dictionary).
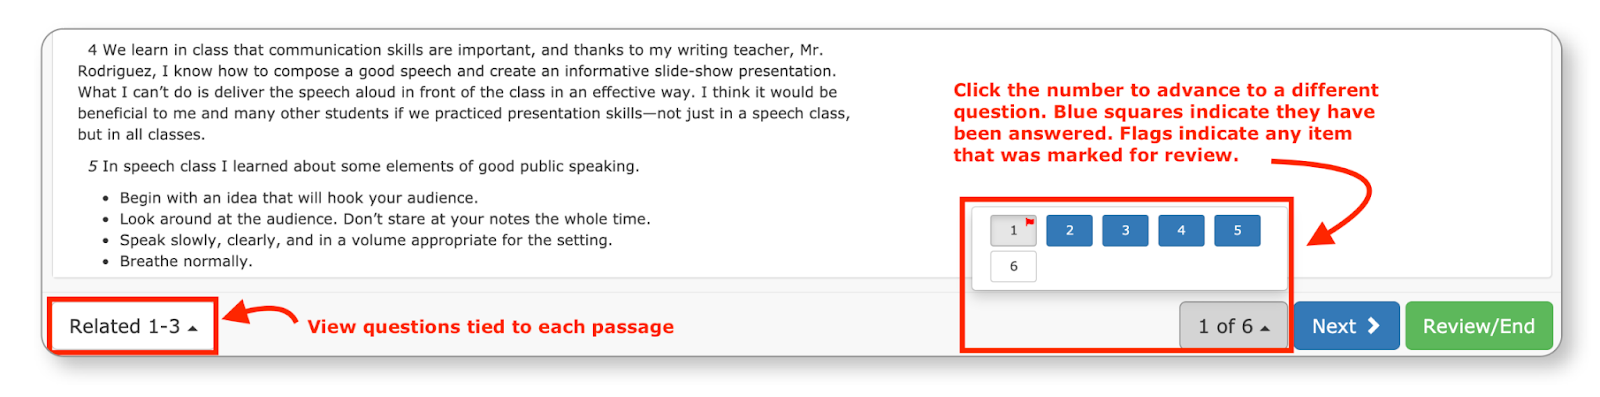
- Reading passages will appear on the left side with the questions on the right. In the event a student is taking their test on a mobile device, they can click the View Related button to read a passage.

Testing Tools — Above each question, students can click the following icons:
- Mark items for review
- Eliminate answer choices (selected items will appear in grey)
- Add notes to each question
Navigate to each question by using the buttons at the bottom of the screen. For tests with passages, the bottom left will provide a way to jump between questions tied to each passage.
Click the numbers to the left of the Next button, to access any question. Blue boxes will indicate that an answer has been selected and flagged items will display a small red icon.
- Once a student clicks the green Review/End button on the bottom right, they will be directed to a final review page.
- If a student is satisfied with their answers, they can click the green FINISH and then the SCORE button.

- It’s important that they do not select SIGN OUT on the top right until this step is complete. Students must click the score button before teachers can generate reports.
- Once scored, a student will not be able to sign in and access the test.
STEP 5: Managing Online Sessions and Teacher-scored items (Rubrics)
- Teachers can view the status of online tests from the TEKSCORE > Responses > Online Sessions path from the top navigation bar.
- Select the test from the menu on the left. The Status icons will indicate the current status of each student. Click the Refresh button periodically for real-time updates.
- As students click the score button, the green check icon will appear next to their names. If the test has rubric-based items that need to be scored, their scores will be highlighted in red with a warning icon. Click on the Rubrics button at the top to enter scores.

Click the individual icons next to a student’s name for the following:
- Test Audit — View details such as when a student signed in\
- Reset — Reset access so a student can sign into that test
- Delete — Delete test record so student can retake or restart a test
- Cancel — Take away a student’s access to a test
- Preview — View results from a student’s assessment
STEP 6: Data Analysis with Teacher Dashboards
Once students have clicked the score button on an online assessment, teachers can open their Dashboards in TEKSCore for real-time results.
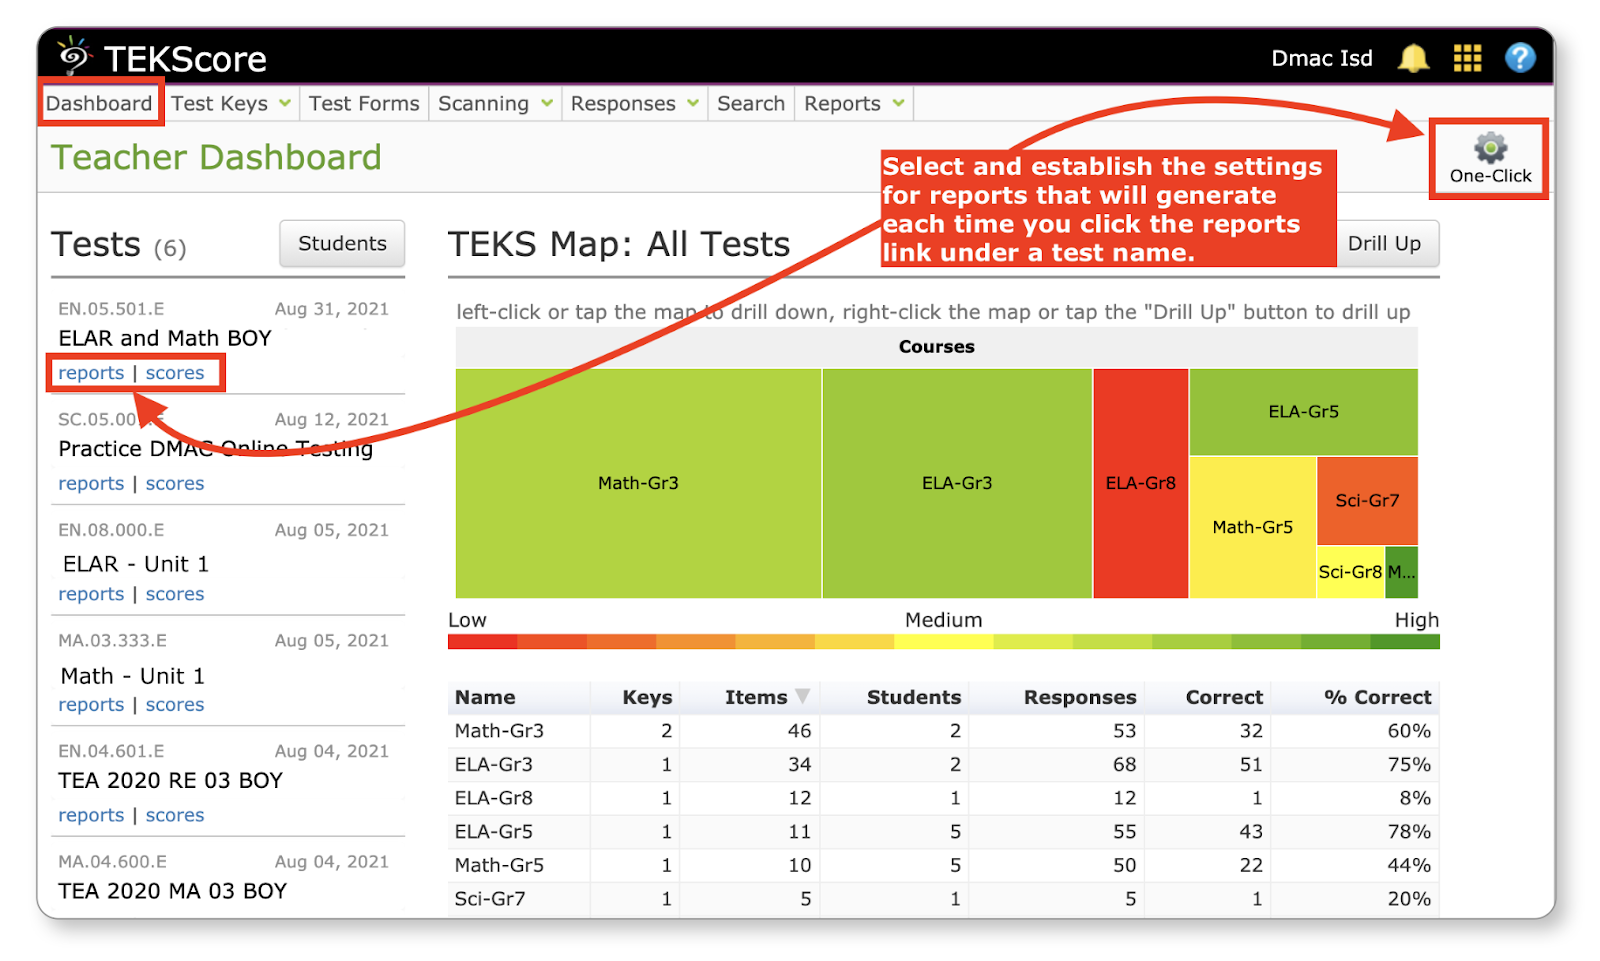
- Teachers can click on the One-Click settings icon to establish which reports they would like to generate each time they click on the reports link under a test name.
- Utilize the TEKS Map in the middle of the dashboard to view performance by subject and performance. The larger the square, the more it was tested and the colors indicate performance with green as a higher score and red being lower.
We are here to help!
Please contact the DMAC Help Desk at 1.866.988.6777 or support@dmac-solutions.net if you have any questions.