 Students
 Educators
TEKScore (eLearning)
** Click on the HELP TOPICS to jump to a new section. Click here to return to Resources page.
Test Key List
TEKScore > Test Key – search for existing keys or create a new test.
- Click Show online keys only to view keys approved for Online Testing.
- Search Criteria – Choose Subject, Grade, Language, Status, Administration or Description to filter test keys.
- The total number of available tests (based on search) is listed in parentheses at the top.
- Sort list from the Order by drop-down menu on the right. (Date, Code, Description).
- Click Find to locate test keys by Session ID.
Individual Test Key Options – Utilize the icons to the right of the test key name to view or make changes to individual tests.
- Preview – preview assessments imported from TAG and approved for Online Testing.
- Edit – make changes to a test key. Editing for Online Tests is limited to the scoring tab.
- Key – print a test key.
- Delete – delete a test key. You cannot delete tests that have documents scored or online sessions scheduled. For access to delete a test key, you must have an administrator login or have been logged into the account to create the test key.
- Reports – view results from scored documents.
- Plain Paper – approve a test key for scoring with Plain Paper answer documents. A green check indicates the test is approved. Once approved, no other changes can be made to the key that impact scoring; however, you may still utilize Online Student Responses or Online testing.
- Archive – choose to archive/unarchive a test key. Archiving a key will remove it from the list of test keys displayed in Documents (unable to print answer docs). Unarchive a key by clicking the icon and checking yes to restore.
- Online Responses – select to enable for Online Testing and Student Responses. To disable the online test, click the cancel icon. By default, this action opens a 5-day testing window (which you can modify from the Online tab of the test key).
New Test Keys
Test Key > New from the top navigation bar in TEKScore.
Header tab
Complete the Header tab to establish the base settings for a test key.
- Subject, Grade, Version and Language establish a short name for each test (ex: MA.04.099E)
- Click the Preview icon to see version numbers already used by someone in your school for that subject and grade level. Up to 999 versions are available for each Subject area and grade per school if using online testing or plain paper.
- Date – enter the approximate date the test will be given to students.
- Description – Enter the name of the test or something that will help you find it in the future. This can include a Teacher’s name, Unit number, etc.
- Passing Standard defaults to 70%.
- Answer Choices – Select 3, 4 or 5 answer choices. This is primarily needed to print Plain Paper answer documents or for the Online Student Response System that contain multiple choice response types.
- Editors – This area is optional and allows other users to edit the test key. The drop-down contains pre-made groups that were identified by someone at your school. New groups and individuals can be added from the Editor tab of the test key.
Content tab
The Content tab lists courses that can be assessed using TEKScore. These include all content areas for which Texas Essential Knowledge and Skills exist.
- Select Subject(s) to populate a list of Courses (including AP) and then choose Course(s).
- This information is used to populate the appropriate SEs and Reporting Categories on the Key tab.
- Multiple courses may be chosen for a test key.
- Subjects/Courses that were saved display at the bottom of the screen.
Key tab
- Use the Key tab to enter the correct responses for assessments and tie them to the appropriate standards for reporting purposes (i.e., TEKS (SE)/TEKS (Dual Coding)/Reporting Categories/ELPS/AP).
- First, enter the number of Items (questions) on the test, and click Apply.
- Enter the correct answers in the first column. The software automatically advances to the next box if entering letters. It will stop auto advancing if you enter a number for a griddable item.
- Stay in a consecutive pattern (alternating vs non alternating) when entering answers.
- Enter an ‘R’ for Rubric answers and a numeric values for griddable questions (ex: 50.25; 0.7865; 1.2, etc.).
- Click Save.
- Use the pop-up window to attach SEs to individual questions (make sure SE is selected from the Standards drop-down). Hover over SEs to see a description. They are color-coded. Readiness = green; Supporting = blue; Process = purple. Use the Year or Type filters to narrow the list. Click Save.
- SE (dual coding) is also available from the drop-down menu, if needed.
- The Reporting Categories section from the drop-down menu provides an Auto Assign feature if the SEs were already selected.
- ELPS can be filtered by Type (Beg, Int, Adv, High) and AP Standards are available for the appropriate grade levels.
- Don’t forget to click the Save button for any updates.
Scoring Guide
- Use the Scoring tab to view or modify how much each question is worth on a test. This page displays the Range, Factor, Weight, Percent and Mastery level of each item.
- The correct answer is listed in the Response column (taken from Key tab)..
- Only for Rubric items, use the Range text box to enter the high end of the range (For example, a range of two would be scored as: 0 = no credit, 1 = partial credit, 2 = full credit). The default for rubric questions is 4.
- Change the Factor – to modify the weight or percentage an item is worth on a test.
- To field test items without counting against a student’s grade, make the Factor zero.
- Rubric items are by default weighted more on an assessment. Change the factor on non-rubric questions to equally distribute the percentages or weights of items.
- Mastery – enter the passing standard for a rubric item (e.g., rubric or 0-6/mastery = 4).
- If Plain Paper forms are being used – a rubric range must not exceed 9. (The answer box is pre-printed on the plain paper form and will only accommodate a maximum ten bubbles – 0,1,2,3,4,5,6,7,8,9). Online testing and Student Responses also have a max range of 9.
History & Editors tab
History tab
- The History tab displays information about how and when a test key is modified. This information is generated automatically by the software and no changes can be made on this screen.
Editors tab
- Use the Editors tab to allow other DMAC logins to make changes to a test key and online sessions.
- Select a Role and/or Campus and place a checkmark next to name(s) before clicking the green arrow facing left to move them to the editors column.
- Remove Editors in the same way by placing a checkmark next to their name and clicking the green arrow facing right.
- Click the Options button to create and save a new Editor Group that would be accessible on the drop-down of the Header tab when making keys in the future.
- You can also use the Options section to find (apply) an existing group or to delete a group.
- NOTE: Anyone who needs the ability to turn a key on or off for online testing (or to modify testing supports) will need access as an Editor to a test key. Those who are not editors would still be able to print answer documents, if needed.
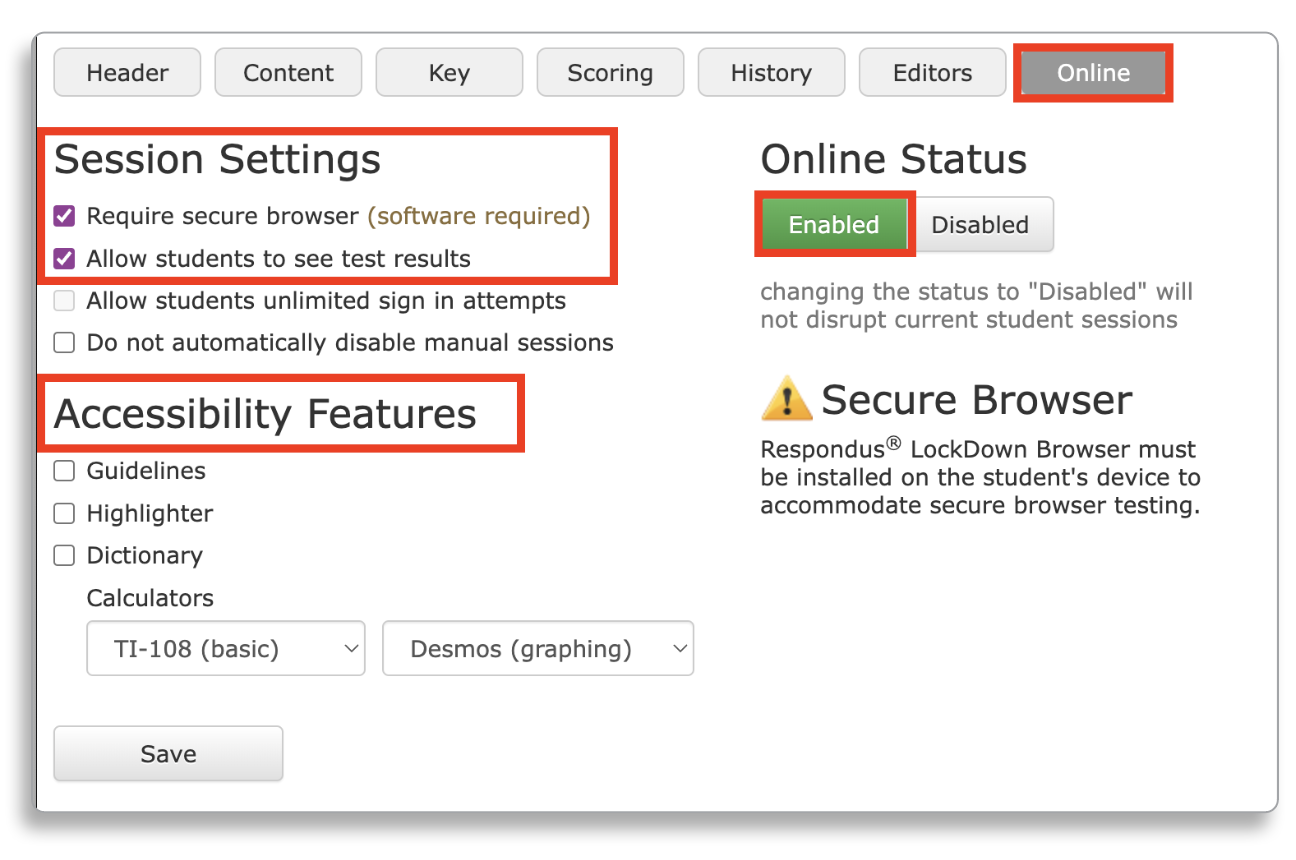
Online Settings
From the Online tab of the Test Key, the following options are available:
Online Status
- Click the Enable or Disable button to manage access to online tests.
Session Settings
- Require secure browser (software required) – follow the steps below to utilize the Respondus LockDown Browser.
- Allow students to see test results – Students will see a message that tells them they got 9 out of 10, 5 out of 20, etc. based on how they answered.
- Allow students unlimited sign in attempts — Students can sign in as many times as they need in order to record their answers–however, once they click on the SCORE button at the end of an assessment, they can no longer make changes. NOTE: This feature is disabled with the use of the secure browser.
- Do not automatically disable manual sessions — online tests remain active past the default of five days. Manually enable or disable access at any time.
Accessibility Features
- Guidelines — Hover over and highlight one line of text at a time. Lock or unlock the position
- Highlighter — Highlight individual words or phrases
- Dictionary — Look up the definition of a word
- Calculators — Three models of calculators by Texas Instruments available for all grade levels and Desmos graphing calculator is available. Select desired models from the drop-downs.
Scheduled Sessions
- Create specific testing windows when students can access the test. Notice the Test ID in parenthesis. This number is unique to the test and will remain the same each time it is enabled or disabled.
Secure/LockDown Browser
Respondus® LockDown Browser is a tool for online assessments. It prevents students from printing, copying and accessing other websites or applications while taking their test.
To use this feature at your school, three steps must be completed:
- REQUEST ACCESS: A District Administrator must email DMAC Help Desk at support@dmac-solutions.net to enable this feature for your school.
- INSTALL REQUIRED SOFTWARE: Install the required software on any device students use to take assessments. They cannot launch the secure browser if the software isn’t installed and you don’t want them to be locked out when they are trying to take a test! Different software is available for Chromebooks, Windows, Mac and iPads.
- ENABLE SETTING ON EACH TEST KEY: Check the Require secure browser session setting from the Online tab of each Test Key.
Software Installation | Secure Browser
Prior to administering an online test, install the Secure Browser on all devices students access.
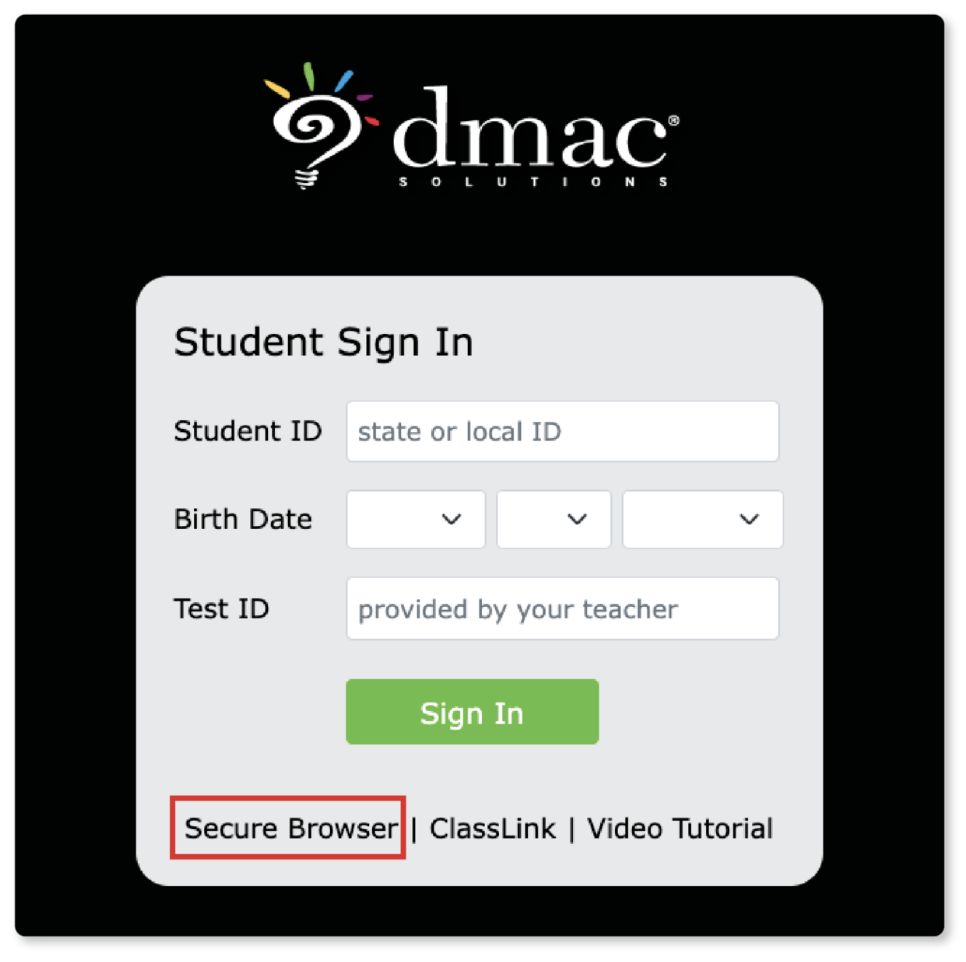
- From the Student Sign In page, click Secure Browser.
- If the secure browser has not previously been installed, select the operating system to download (DMAC supports Chromebook, Windows, Mac and iPads).
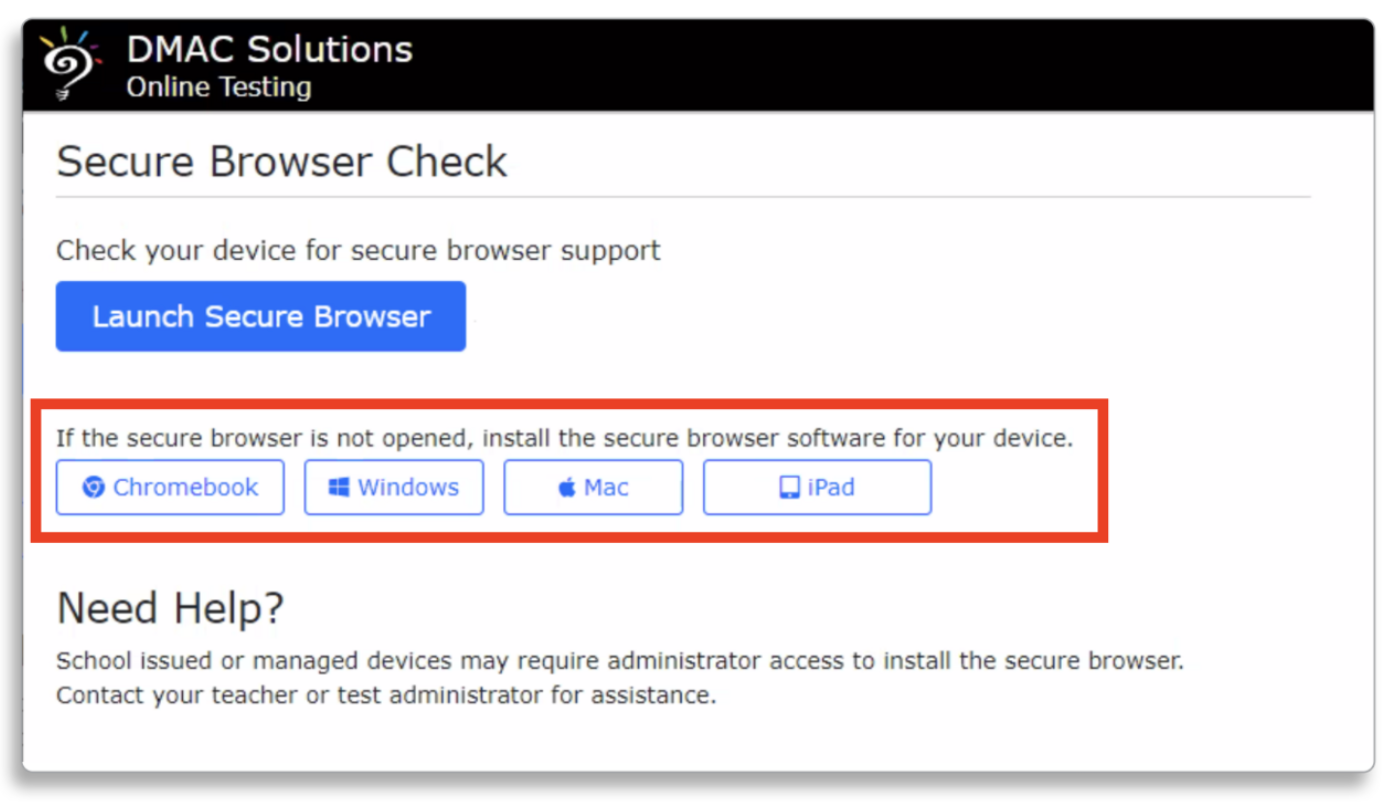
- Follow the installation steps (each vary based on the selected operating system).
- **Please Note: If you have any issues downloading the software, please contact a technology person at your district.
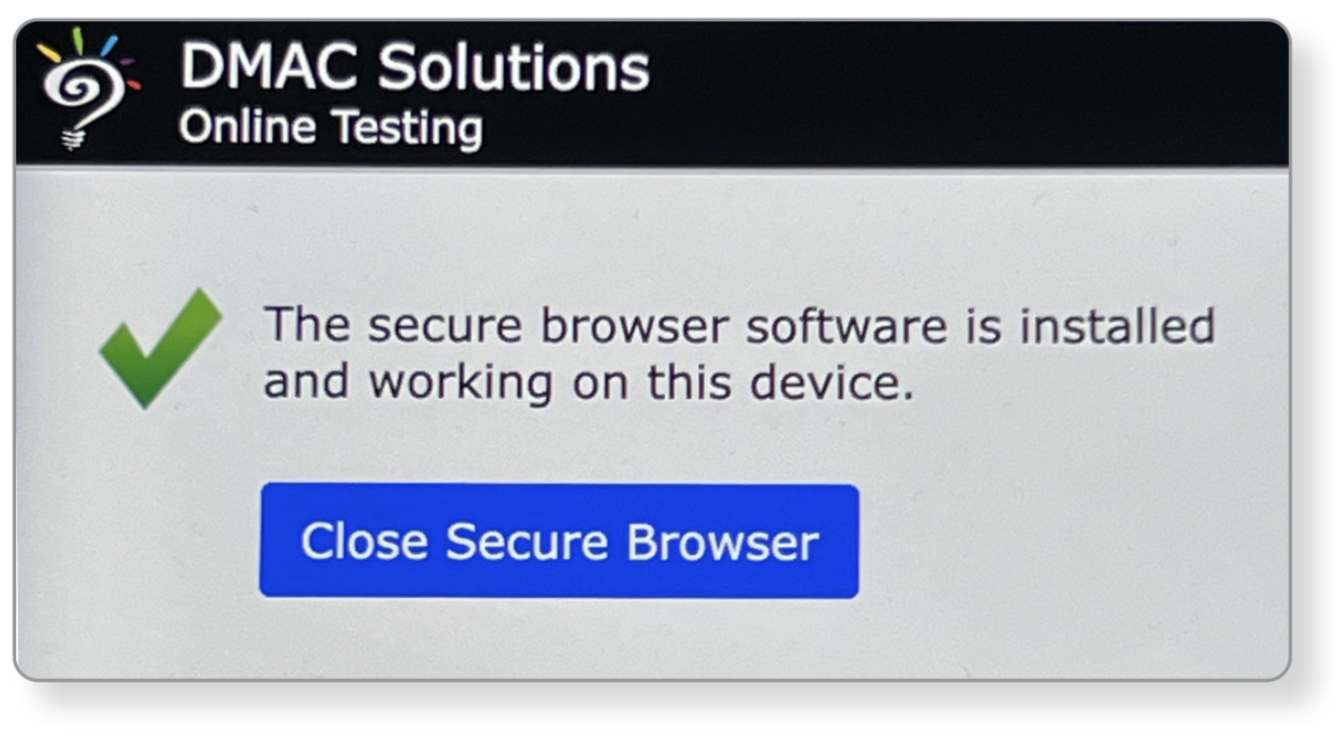
Close and return to Secure Session screen.
TECHNOLOGY ADMINS:
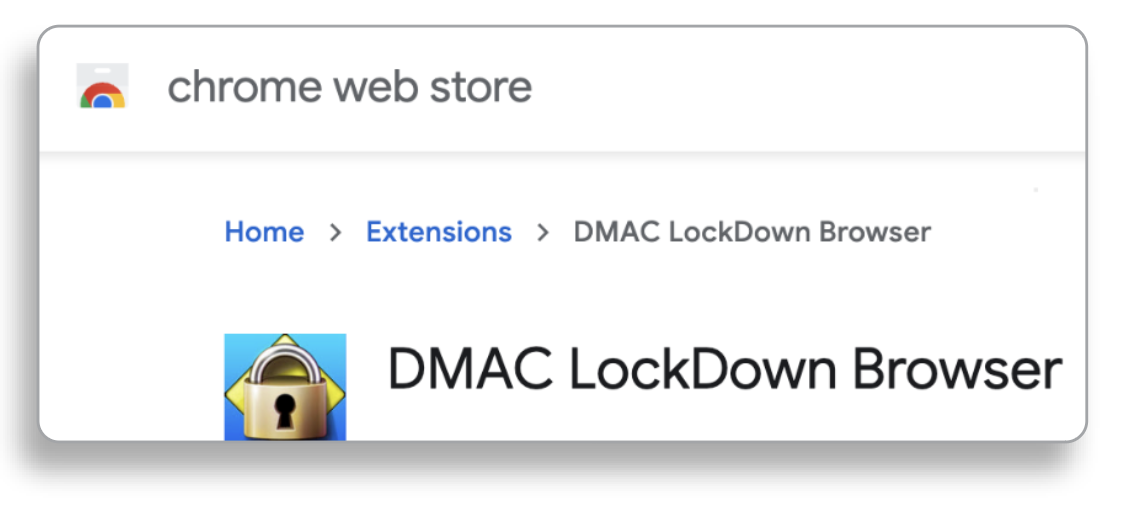
- Deploy Respondus to Windows managed devices > Download here
- Use the Chrome extension and App ID (ajlbefpfkpconmnpplgnafofcgbndjjn) to push the Respondus/DMAC LockDown Browser to managed Chromebooks
Session Settings | Secure Browser
IMPORTANT: ‘Require secure browser’ must be checked from the Online tab of each test key you wish to use the secure browser during an online test.
- The option to Allow students unlimited sign in attempts is automatically disabled with the secure browser.
- If a student closes the secure browser before completing a test, teachers must utilize the Online Sessions section of TEKScore to reset their access to a test.
For Students | Taking Assessments on Secure Browser
IMPORTANT: Students must close all windows EXCEPT the test browser window before beginning a test.

- Students enter the required information (Student ID, Birth Date and Test ID) on the DMAC Student Sign In page.
- Click Launch Secure Browser and Open LockDown Browser OEM (pop-up window).
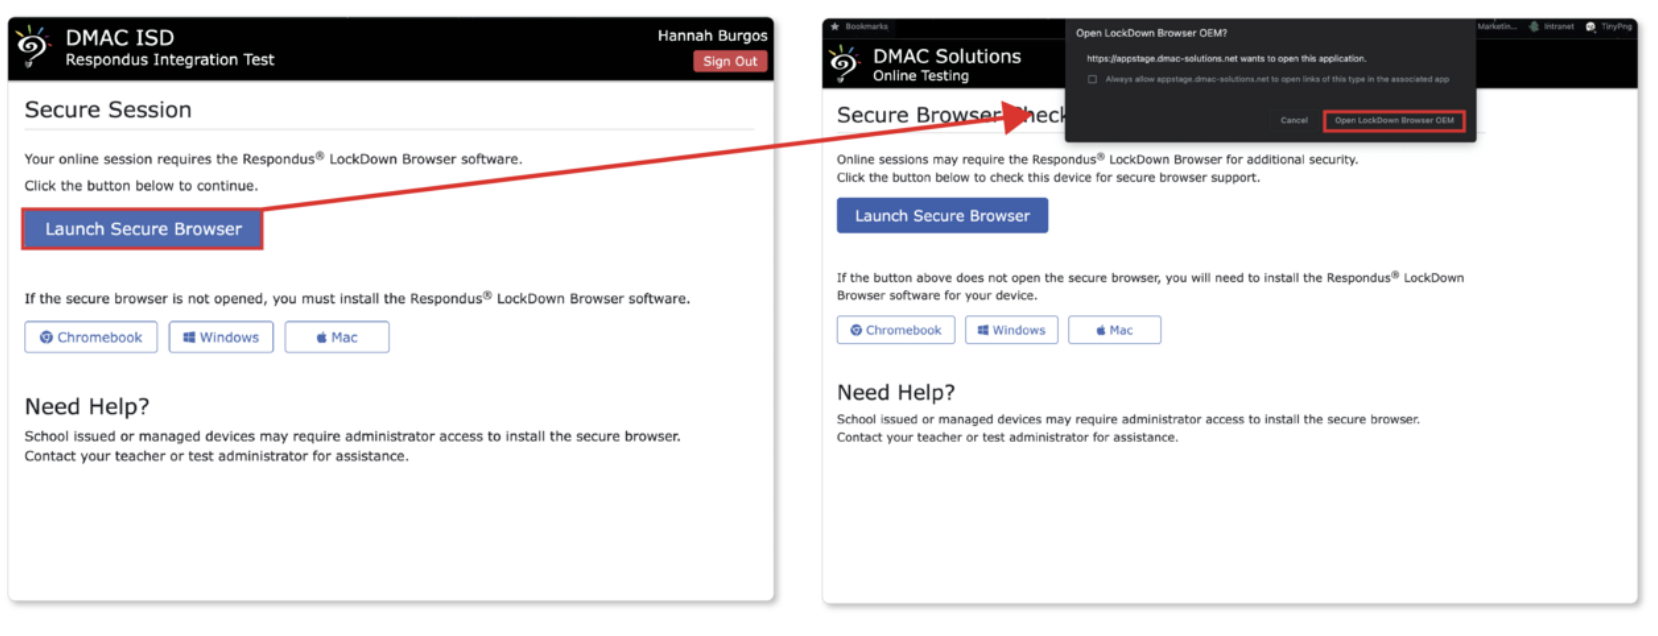
- A new window opens and all other applications and windows must be closed.
- If prompted, to close a blocked program (e.g., screen capture, instant messaging), click Close Applications.
- Students then complete the online assessment and click Close Secure Browser to end a session.
Import a Test Key
- Importing a test key allows you to make a copy of an existing test key without manually entering in all answers and attaching the standards.
- First, create a new test key and complete the Header and Content tabs before selecting the Key tab.
- Click the Import Key button.
- Select from the STAAR, TAG, TEKScore and CRIMSI tabs to import a key.
- On the left, select the Language, Year, Subject and whether or not you’d like Alternating or Non-alternating answer choices. Check the name of the test on the right and then click the copy button.
- IMPORTANT: Importing a STAAR key will create the key exactly as it was at the time of testing. If the SE’s have been updated since then, that will not be reflected on this copy. Contact the DMAC Help Desk if you have any questions.
- You can use the TEKScore tab of the Import Key function to make copies of existing tests. Pull in test keys from previous school years or make multiple copies of the same test that can be modified for different groups of students such as SPED or intervention groups.
Collect Data
The power of TEKScore lies within the collecting and reporting of local assessment data for students. Once you have a test key setup in TEKScore, collect student answers through the following methods.:
- Online Testing is by far the quickest and easiest way to get student data and real-time results. With this method, students can sign in online to enter their answers. They will see the test questions and any testing supports they were given access to. As soon as they click the score button, you have access to reports. To utilize online testing, schools have to create the tests in the TAG application first.
- The Student Response System works similar to online testing; however, The biggest difference is that the students will not see passages or test questions. Instead, they will see something similar to what would be printed on a test form. This includes the bubbles for the answers, or griddable items.
- From the Responses > Manual option of the top navigation bar, locate test keys and groups of students to manually enter in their answers. For example, this can be done for students who were absent or it’s also a great way to collect data for those early grades K through 2. If the students are not ready for Online Tests or filling in bubbles on paper, you can have them complete the information and then quickly enter their answers. This opens up a whole new world of data and reporting even in the youngest grades.
- If you’re wanting to collect answers on paper, print test forms either on Plain Paper.
- Plain Paper Answer documents are those that you set up on standard printer paper and print them out. Use almost any type of scanner or copier to scan in the results as long as they meet the basic criteria of:
- Paper Size: Letter (8.5 x 11 in)
- File Type: Multi-Page Tiff (.tif)
- Resolution: 300 x 300 dpi
- Scan Type: Black & White
Online Testing
Online Testing in TEKScore gives students the ability to sign in and take a test that has been activated by a teacher or administrator.
First, tests have to be created and exported from the TAG application to be available for Online Testing. For questions, please call the Help Desk at 1.866.988.6777.
- Click here for everything you need to know about Online Testing
Student Information Needed
- Students need their 1) Local or State ID; 2) Birthdate; and, 3) Online Test ID to access tests online.
- Teachers can quickly print a list of their students’ information in DMAC.
- Click on your name in the upper right hand corner
- Click My Account
- Click Print above the list of classes for ALL classes or choose Print for individual classes – (use EITHER state or local ID number)
- NOTE: Users logged in at the District or Campus level will need to click Teachers in the top navigation bar in Utilities > select a teacher > Click preview icon in order to print IDs for a specified class.
Student Response System
- To simply collect responses online, you can enable test keys in TEKScore for online responses.
- The Online Student Response System in TEKScore gives students the ability to sign in and enter just their responses to a test and it does not require the test to have been created in TAG.
- This option doesn’t include all of the features of online testing such as displaying the questions and passages (see Online Testing in DMAC) — students will need access to view test questions (e.g., via a printed test or displayed on a SMART board)
- Access the Online tab of a test key and click the Enable button under Online Status.
- Change Session Settings, as needed and click Save.
- Students will need their Local or State ID; birthdate and the Test ID number listed here to login and access the test.
- From the DMAC homepage, students will click the Students button and enter their information to Sign In.
- After confirming their teacher and test information, students can enter their answers and click Review. Once they’ve entered everything and clicked the Finish and then Score buttons, teachers will have access to their data.
- Clicking Score will automatically sign students out of their test and they can no longer make changes.
- Managing sessions, scoring rubrics and viewing reports will all work the same as with Online Testing in DMAC.
Manual Data Entry
Once scored, a line will appear through the student’s name and their information populates on the top right. Click on the View button to open a new tab with the student document.
- From the top navigation bar in TEKScore, click Responses > Manual.
- On this screen, you can identify any test and group of students to manually enter their responses.
- For example, this can be done for students who were absent or it’s also a great way to collect data for those early grades K through 2. If the students are not ready for Online Tests or filling in bubbles on paper, you can have them complete the information and then quickly enter their answers. This opens up a whole new world of data and reporting even in the youngest grades.
- Select a test on the left. Use the filter to narrow the list, or hover over each test for a date and description.
- In the Students column, use the magnifying glass icon to find a class by selecting a campus, teacher, semester and class. Students will appear in the column after choosing the class. Click the red x to close the pop-up window.
- Select a student’s name on the list to enter their responses; click the Score button.
Rubrics
Online Tests
- From Responses > Manage Sessions Click on Rubrics button. (this will not appear if the test did not have a rubric question).
- Select the direction you want the columns to Auto Advance and check Preview to see student’s responses as you enter the scores.
- Inside the preview screen, you can also enter scores or view how many times a student hit the return button (helpful for longer essays).
- Click in the empty box to enter Rubric Score.
- Each column will indicate the max score available per question.
- Select the student name (underlined) to view the student document and other responses.
- Click the Return icon to go back to Online Sessions page or click Print to print one or more student’s answers to the rubric questions by checking individual names or the Student box at the top of the column.
- Click Save. This will automatically rescore the student’s assessment.
Other Tests
- Click Responses > Rubric from the top navigation bar.
- Identify the teacher and select the test using the filter to narrow the list.
- Use the drop-down to enter responses for All classes or specific periods.
- Enter scores for each student and rubric based question.
- Use the Auto Advance to decide which direction your cursor advances, enter scores and click the Save button on the bottom. This will automatically rescore all tests.
Override
**Video has no sound
- Available for short text, inline text, and equation editor item types.
- Can be completed by Teacher of Record or the District Administrator.
- If a student has given an acceptable answer that is not scored as correct, utilize the override feature to give credit for correct responses.
- Click Responses > Override from the top navigation bar.
- Identify the teacher, select the test.
- Use the class dropdown to populate students with an incorrect response.
- Select Assessment Item to override.
- Click Y to update answer to correct.
Plain Paper
To collect student answers on paper, there is one option, Plain Paper.
Plain Paper
- The plain paper feature allows you to create and print your own answer documents for students. Contact the DMAC Help Desk at 1.866.988.6777 if your school does not have this feature currently enabled.
Before giving any tests on Plain Paper, complete these steps.:
- Test Keys must be approved for printing on Plain Paper.
- Click on the Paper Icon (from the test key list or individual key).
- View the form and click the Approve button.
- Once a key is approved, changes that alter the layout of the test form will not be allowed. This includes: adding or removing items; changing an item’s type (multiple choice, rubric, numeric); changing a rubric’s range; and, changing a numeric item’s format (i.e. changing the grade level).
- Keys that have been approved will have a green check mark in the paper icon.
- NOTE: You can still use the keys for other methods like online testing after approving; it does not limit the test key for only plain paper testing.
- Run a Printer Test for the printer you will use to print answer documents. This operation is required to test the accuracy of any printer used to print forms.
- From the Test Forms section of the top navigation bar, click the blue Run Printer test button. Print the test form; scan it in on the device you will use for student documents; upload the file and make sure
- IMPORTANT: when printing forms, make sure that all of the corner registration marks print and that you do not have the page size scaled or ‘print to fit’ selected.
- Recommended scanner settings – any scanner or copier that can meet the settings below should work; however, ALWAYS run a test before printing student forms.
- Paper Size: Letter (8.5 x 11 in)
- File Type: Multi-Page Tiff (.tif)
- Resolution: 300 x 300 dpi
- Scan Type: Black & White
Scantron
PLEASE NOTE: SCANTRON/OMR Scanning has been discontinued effective June 1, 2023. The Scan Online feature will be removed from the top navigation bar in TEKScore.
Test Forms
Print Test Forms
- Select Test Forms from the top navigation bar
- Select Campus, Teachers, Grade, Semesters, or Course Information (Select only what you need. It’s not necessary to select each area). Teacher accounts will only have access to assigned classes.
- Click Search.
- From the Search Results page, either check next to the class name or click on the number on the far right to select individual student names.
- NOTE: Checking the box by Teacher’s name will OVERRIDE anything selected in student box.
Choose Print Plain Paper Forms.
- Plain Paper Forms
- Before moving forward, ensure the test key was first approved for Plain Paper. It will not show up on this page if it wasn’t approved.
- Printing Guidelines – print forms on standard 8.5″ X 11″ white paper with black ink only; all four registration marks, shown in the image, must be printed on all forms; if printing forms to a printer for the first time, run the printer test. If the results show Failed, contact the DMAC Help Desk for assistance.
- Select a Test Key to view forms.
- Choose a grid format (math/science tests); Print Order and Font Size.
- Use the printer controls at the top to print out documents.
Scanning
- The scanning section of TEKScore will allow you to pull in completed answer documents for Plain Paper tests.
- Click Scanning from the top navigation bar to start the process for Plain Paper.
- This is probably the most technical aspect of DMAC because the equipment schools use is so varied. We recommend that all schools who need to scan for the first time, contact the DMAC Help Desk so we can walk you through this process step-by-step.
- Use the Scan History section to view documents and troubleshoot.
Search
Create custom queries using the Search menu from the top navigation bar.
Always remember that “less is more” – the less criteria selected, the more documents are displayed in the results.
Search Fields
From the Test Search page, identify at least one of the following fields: Test, Campus, Teacher or Student.
- Test – The Year displays the current school year; select a test from the drop-down or use the filter to narrow the list..
- Teacher – Scored teacher is who was selected for online test or form; Current teacher tied to a student via the most recent Class Roster data file.
- Result – Select Passed (yes or no); or, enter range of scores.
- Location – campuses displayed depend on the user profile. For a district account, all campuses appear. Otherwise, only the user’s campus is searchable.
- Student – enter a Student ID; select a grade level (currently enrolled); or, enter partial or full last/first names.
- Scoring – enter name of DMAC login who scored student document or date range when document was scored.
- Demographics – Choose either Scored Demographics (at the time the document was pre-coded) or Current Demographics (may be different if the Class Roster has been updated).
Search Results
- Click on the headers to sort columns.
- Total number of documents from search is listed on the bottom right. Use the page sliders on the bottom left to see all results.
- Click on individual icons to the right of each test document to:
- Preview – view and modify test information.
- Print – View or print test information.
- Delete – delete a test document. Users can only delete documents they personally scanned or manually scored (or have an Admin/Manager login).
- Check next to one or more documents (or all from the top of the column) to use the icons on the top right for the following:.
- Web Edit – edit and filter documents with errors, compare to plain paper scan and view audit history.
- Print – print documents seen on the screen or batch print student documents for the selected students.
- Report – generate custom reports with selected students based on the search..
- Export – export .txt or .csv files with more information based on search results.
- Edit – batch edit selected documents.
- Delete – delete selected documents.
- New – click this icon to manually create a new test document for students..
- Search – click this icon to return to the Search page.
Batch Edit Documents
Make changes to multiple documents with the Edit Wizard:
- From the Search Results screen, choose the Edit icon (top right).
- Identify the test Key to edit by choosing the Test Key Code.
- Check the specific documents for all (top of column) or selected students.
- Select the type of changes (replace test key/class or update demographics).
- Click Save.
- NOTE: Editing is only available for documents that you have created, scanned or scored unless you have an administrator level DMAC login.
Test Documents
Individual Student Documents provide a detailed summary of an assessment. This includes the correct answers to a test, what the student answered and how much credit they received. It also displays more information about the test and how it was coded.
Many parts of the document are editable by clicking on the links to the right of the section names.
- The Student section lists the Name, Grade, and Gender. Click on the View Tests link to see a complete history of local assessments for the selected student. A pop-up displays more information. Click the magnifying glass icon to switch to another document.
- The Class information includes the class and teacher that was selected for either a test form or an online test. The replace class link allows you to change classes. Please note, if selecting another teacher or class, that student must already be enrolled for it to appear on the list.
- The demographics shown on the student document display information about the student at the time of the test. Select the update demographics link to make changes.
- Click the replace test link in the test section to rescore the document to another test key.
- The Results section contains a student’s performance on the assessment along with more information about when and who scored the test. This is important because a document can only be edited or deleted by the person who scanned and scored an assessment.
- Click edit responses to make changes to a document. Once saved, this will update the student’s score.
- Click passage strategies to view strategies or test supports utilized on passage.
Responses Icons

Click on the icons to the right of each question to view strategies or test supports students utilized during online tests and how many times they were used.
- Flagged Question
- Guideline
- Calculator
- Highlighter
- Dictionary
- Text-to-Speech
- Content and Language Supports (CLS)
- Notepad
- Eliminator
Document Icons
- Print – Clicking Print will produce a PDF of the Individual Student Document. Make selections > choose view report.
- Delete – Delete documents you have access to.
Export Data
- From the Search screen in TEKScore, use the Export icon to open information from student test documents in either .txt or .csv formats.
- Please note: You can only export results from one test at a time. Make sure to select a test from the drop-down when using Search.
- After clicking the icon, the total number of documents included (based on the previous search) display at the top of the page.
- To export documents related to CRIMSI, click on the button in the blue section. For all other exports, select the Format (.txt or csv) and then check which Fields to include. Use the tabs to select more information.
- Select Options to include either Column Headers or a Text Qualifier; click the Custom Export button.
Reports
Don’t forget! A lot of reports are available on the Teacher Dashboards > 1-click Report Settings.
- Choose the type of report from the top navigation bar:
- Instructional – by District, Campus, Teacher, Student or with a custom search/group.
- Teachers – select desired tests, classes or students (by teacher).
- Students – student level progress reports for one or more students at a time.
- Trend – assessment data from multiple local assessments over time.
- Comparison – comparing TEKS and SE performance from multiple assessments for different campuses or teachers.
- Criterion Tabs reflect the scope or group of students for which reports will be available. Your DMAC user role determines which tabs can be accessed.
- District – data for the entire district.
- Campus – data by a specific campus.
- Teacher – data for a teacher/or selected teachers (teacher logins can only access current students based on class roster upload).
- Class – data for a specific class period(s) — available only in teacher reports.
- Student – data for individual students.
- Search – data created after a custom search is created from Documents > Search.
- Group – data generated for a custom student group (create groups in Utilities and filter for them in Student Portfolio).
- Move from top to bottom, left to right when selecting options to generate reports.
- Select the test(s) to generate reports (filter available to narrow the list).
- Check next to Report titles; choose Options (Sorting and Quintile icons offer additional choices). Click View Report button or check to Export report data. Reports will open in a new window in PDF format.
Teacher Reports
The Teacher reports section generates the same type of reports as Instructional. Click current teachers to see teachers that are currently assigned to students who took the test based on the Class Roster data file uploaded to DMAC. (District or Campus logins may select a teacher or multiple teachers for reports).
- Teachers will only see their name and their student test data.
- Class tab – Choose teacher from drop-down list by clicking select (If a teacher is logged in – their name will be populated).
- Select tests and class(es) for viewing reports by specific class(es).
- Class(es) displayed in the window are based on the Class Roster data file.
- NOTE: You may run reports by teacher from the Instruction Reports; however, you cannot choose the class(es).
Student Reports
Student level reports are available in Instructional Reports and the separate Student Reports section in TEKScore.
- Students displayed are those who took the selected test based on the Class Roster data file uploaded to DMAC.
- NOTE: When logging in as a teacher, only current students’ test data is accessible.
- Instructional reports:
- To print individual student reports, check print individual reports check-box. If documents were printed for homeroom but content teacher is pulling reports, check the box for list all tests.
- Student Reports:
- Select Year, Campus and Grade (may auto populate based on login).
- Select Student(s) or select All. Click the Refresh Tests button to view tests.
- Expand/collapse the available tests for each subject area by using the (+/-) on the tree. Choose test(s). Check report(s) to generate.
- Click View Report.
Trend Reports
- Available by District, Campus or Teacher.
- Select multiple Tests (filter tests by selecting the filter icon and specify criteria.)
- Check report(s) to generate; click View Report.
Comparison Reports
- Available by District, Campus or Teacher
- Select Content Area, Course and Test Key(s).
- Check report(s) to generate; click View Report.
Dashboards
- Once students have clicked the score button on an online assessment, teachers can open their Dashboards in TEKScore for real-time results.
- Teachers can click on the One-Click settings icon to establish which reports they would like to generate each time they click on the reports link under a test name.
- Utilize the TEKS Map in the middle of the dashboard to view performance by subject and performance. Click individual squares to drill-down. Right click to drill up.
- The larger the square, the more it was tested and the colors indicate performance with green as a higher score and red lower.
- View individual results by student by clicking the Students button to the left of the TEKS MAP in the test view.
District/Campus Dashboards
- The District and Campus Dashboards are only available for district and campus level DMAC logins. To access the Dashboard in TEKScore – click on Dashboard from the top navigation bar, or click view Dashboard.
- Campuses – Access Individual Campus Dashboard by clicking on the name of the campus.
- Performance Map: All Tests – Click on the name of the Content Area to drill down to:
- Grade level
- Campus (opens in a new tab)
- Teacher (opens in a new tab)
- TEKS
- SE
Click Drill Up to return to previous Map.