 Students
 Educators
Online Testing (eLearning)
** Click on the HELP TOPICS to jump to a new section. Click here to return to Resources page.
Schools who purchase both TAG and TEKScore can create online tests for students.
Create a Test in TAG
- Tests must be created in TAG for students to see them when testing online in DMAC
- To create a new test, select Tests > New on the top navigation bar–or, click the New icon from the Test > Search page
- Enter Test Name (required)
- Directions and Keyword(s) are optional
- Separate words or phrases by commas in the keywords section. Key words can be used to filter for tests on the Test > List page
- To add items after creating test, check option to add items after save
- Select Upload File to attach a source .pdf (optional)
- Click Save
Add Items to Test
- Narrow down the list of available test items by: Language, Content Area, Course, TEKS Year, Source, and/or SE. Click Search.
- Total number of available items (based on search) are in color-coded boxes by source type (Total, User, Shared, TAG, TEA, TEKS-RS).
- To further filter items, click on Keywords, SE numbers or Passage names . This will start an Advanced Search. Click the On/Off button to add or clear filters.
- Add items to test by checking boxes to the far left (next to date).
- Click the checkbox at the top of the column to add all items on the page.
- Once checked, items are automatically saved to the test. Uncheck an item to remove it.
- The number of items saved to a test appears next to the Test Name at the top.
- Click the preview icon next to individual items or click the icon at the top to preview the test.
Advanced Search
- Additional filters appear as Advanced Searches.
- For example, clicking the yellow keyword boxes in the Question columns (e.g., ‘Spelling’ ) narrows the available items to only items associated with the selected keyword.
- Click the (X) Keywords box or the Off button next to Advanced Search to clear a filter.
- Click the On button next to Advanced Search to filter available items by Item Usage, Year, TEKS-RS Unit, Response Type, Dual SE, DOK Level, Passage, Genre, etc.
Select Apply, Clear or X to close the Advanced Search pop-up.
Edit Test
- Click the Edit icon to reorder test Items, Passages or Graphics.
- Drag and drop items to re-order. This can be done for individual items or grouped passages.
- Click Save Order
Important Test Icons (top right)
- Share test with other individuals or share groups
- (ABC) View SE Percentages of test
- Add additional items to test from the Test Items screen
- Preview test
- Print test or save test as a .pdf
- View or print Test Key
- Return to Test List page
Test Key to TEKScore
- Click icon to Export Test Key to TEKScore from the Test List page in TAG (next to desired test name)
- Select Copy Key AND Content
- Check Review and approve online content
- Select Alternating or Non-alternating and click Copy
- The TAG test will open in TEKScore as a New Test Key
- Grade and Version is required. Other areas are optional. Click Save.
- This completes the Header tab
- Make changes to the Content and Scoring tabs, as needed
- The Key tab will be pre-populated with answers and tied to standards based on your TAG test
- Move to the Online tab
Online Test Settings
From the Online tab of the Test Key, the following options are available:
Online Status
- Click the Enable or Disable button to manage access to online tests
Session Settings
- Allow students to see test results – Students will see a message that tells them they got 9 out of 10, 5 out of 20, etc. based on how they answered
- Allow students unlimited sign in attempts — Students can sign in as many times as they need in order to record their answers–however, once they click on the SCORE button at the end of an assessment, they can no longer make changes.
- Do not automatically disable manual sessions — online tests remain active past the default of five days. Manually enable or disable access at any time.
Test Supports
- Guidelines — Hover over and highlight one line of text at a time. Lock or unlock the position
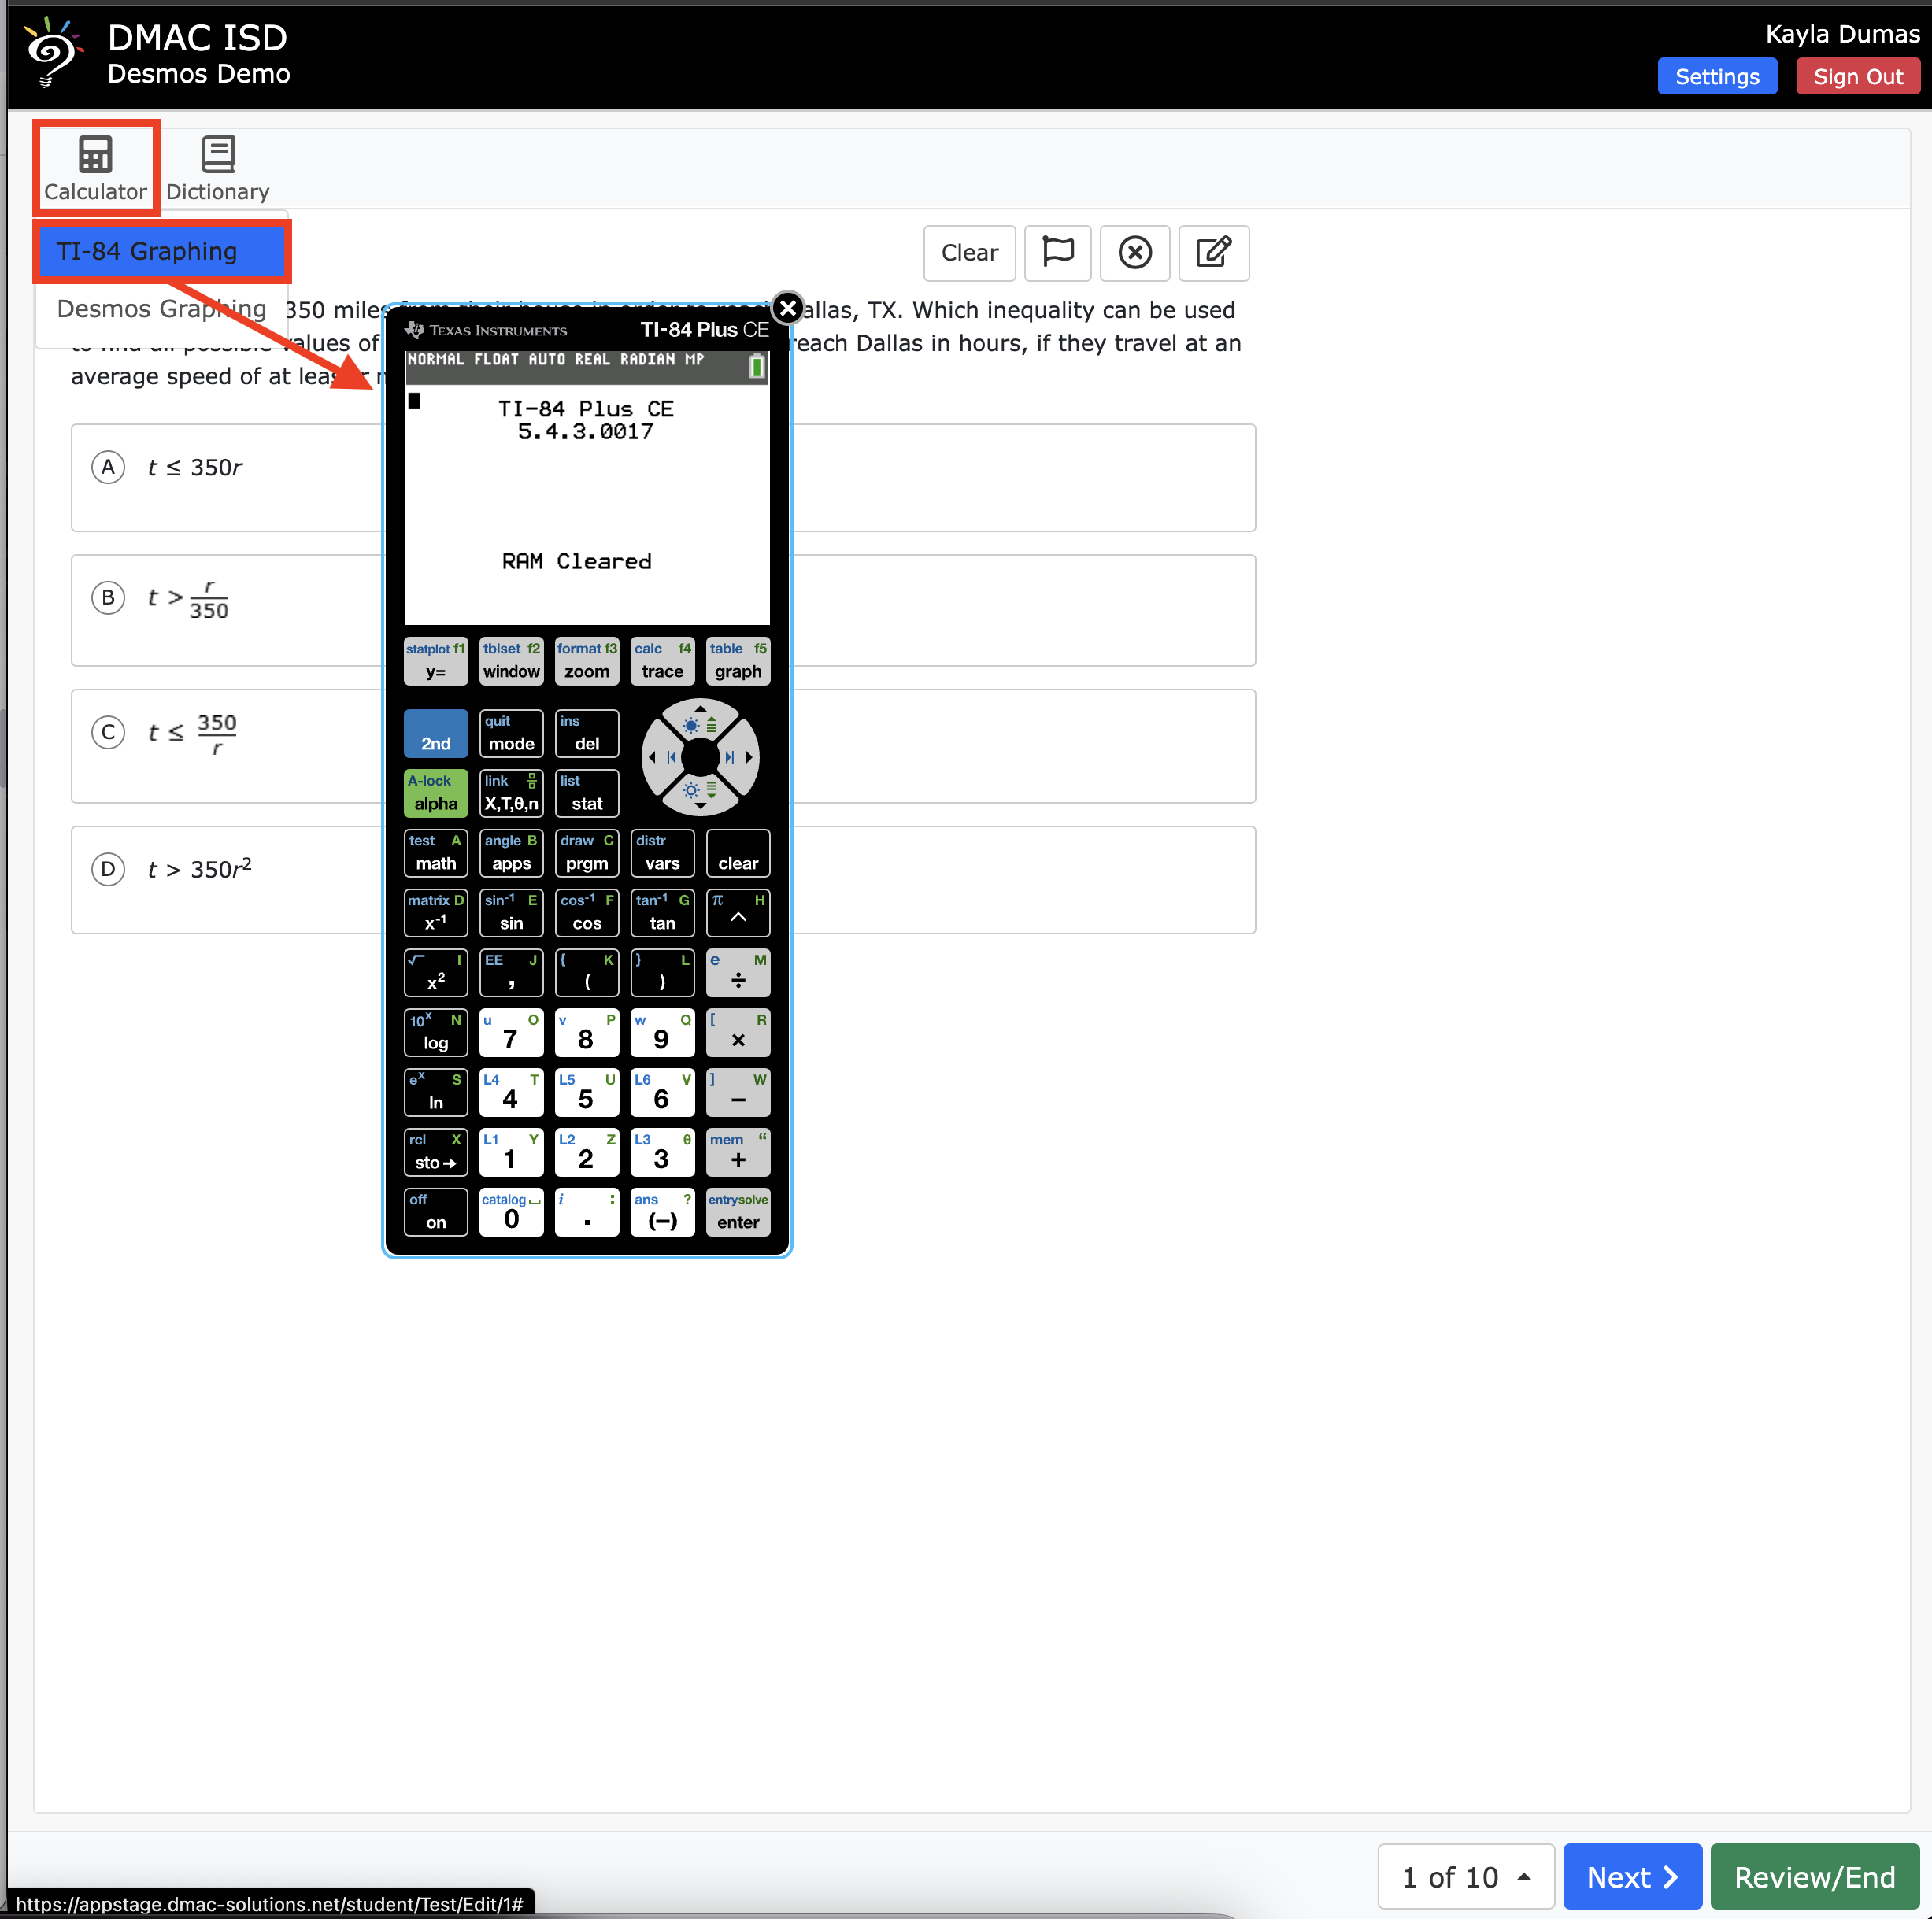
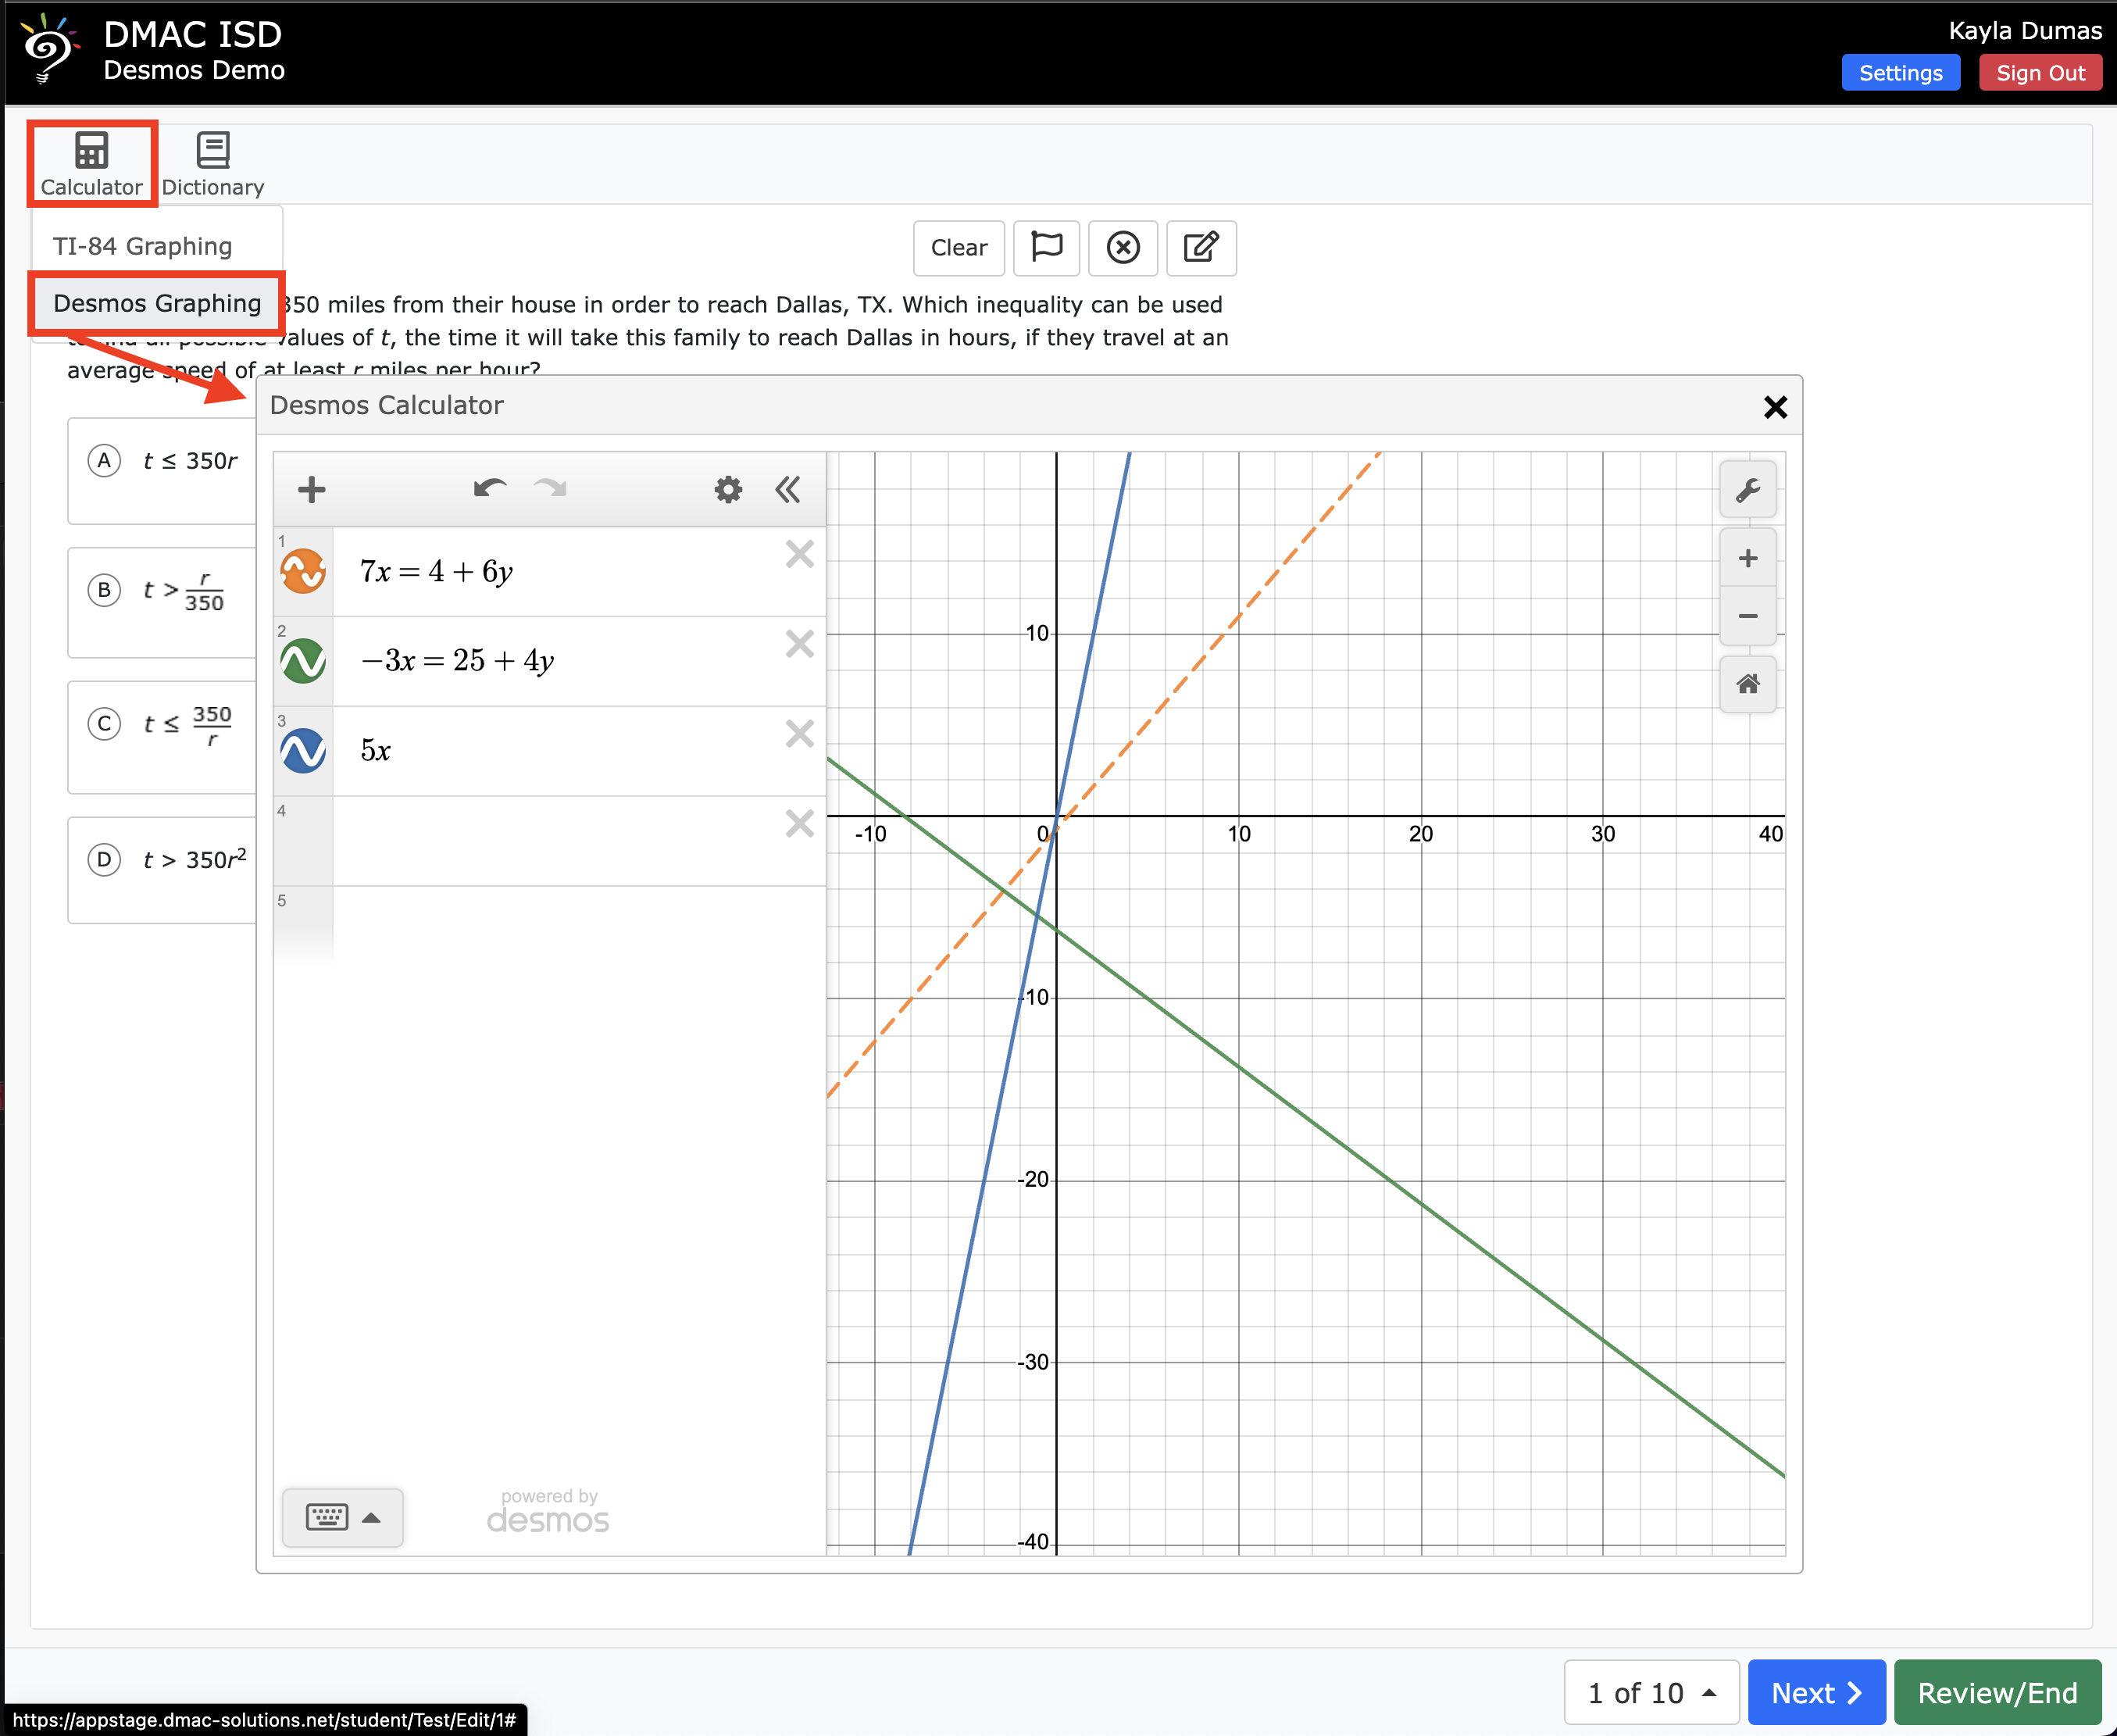
- Calculator — Three models of calculators by Texas Instruments available for all grade levels and Desmos graphing calculator available for Algebra I. Both styles can be active during a test.
- Highlighter — Highlight individual words or phrases
- Dictionary — Look up the definition of a word
Scheduled Sessions
- Create specific testing windows when students can access the test. Notice the Test ID in parenthesis. This number is unique to the test and will remain the same each time it is enabled or disabled.
Secure/Lockdown Browser
Click here for everything you need to know about Secure/Lockdown Browser.
Test Key List
- Another way to activate online tests is from the Test Keys > List page.
- Click on the Student icon to enable online access. The unique Test ID will appear under the active online signal.
- To disable access to an online test, click the Cancel icon. This can be done as many times as needed. Once created, the Test ID will remain the same for that test.
- Click the Preview icon to view the content of online tests (this will only appear for tests exported from TAG).
Individual Online Supports
- Assign individual Online Testing Supports for students through Student Portfolio.
- When assigned, this provides students access to features such as Text-to-Speech, Calculator and Content and Language Supports while they are taking online tests.
- Enable Supports for individual students or groups of students by using the Batch feature.
- IMPORTANT: This step must be completed in Student Portfolio prior to a student signing in to take a test online. This feature is only available in Student Portfolio (given that it applies to individuals and not entire classes or grades).
- Open Student Portfolio and use the filters on the left to narrow down your list of students.
- To enable Supports for more than one student at a time, place a check mark next to the desired students (to the left of their names) or check the Select All box on the top of the column and click the Batch icon.
- To enable a Support for an individual student, click on the Supports icon next to their name from the Student Portfolio Search screen. This will open the student’s individual portfolio on the Supports section.
- Check the Supports you want to enable (by subject) and click Save.
- From the Student Search screen in Student Portfolio, students with active supports have a green check icon in the Supports column. Hover over the icon to see the number of supports assigned.
- Once enabled, a student will see their assigned supports while taking tests.
Student View: Online Tests
- Click the Student icon on the DMAC homepage at https://www.dmac-solutions.net or sign in at https://apps.dmac-solutions.net/student/
- To sign in, a student will need the following:
- 1) State or Local ID, 2) Birth Date and 3) Test ID.
- Note: Students will see an error message if they have previously logged into a test and clicked the Score button.
- Teachers can print a list of Local IDs and birth dates for their students, from Utilities > My Account.
- Click the Print or Export icons for all assigned students or by individual classes.
Starting Tests Online
- A student’s name appears on the top right after signing in.
- Text-to-Speech settings are visible if that student has been assigned TTS for that content area. They can test that the sound is working by clicking the Play button. This will read the sentence listed.
- Change the voice by using the drop-down menu (names/voices available are different depending on the device such as a Chromebook or iPad).
- Use the sliders to change the volume, pitch or rate of speaking and click the Play button once again to test how it sounds.
- Click Continue.
- If a student DOESN’T have TTS assigned, they will first select their teacher, semester and class before clicking Continue.
- Double check that all of the information is correct before clicking Continue.
- Students can return to this page during a test by clicking the SETTINGS button on the top right.
- IMPORTANT NOTE: DO NOT click the browser back arrow; this could lock the test session for the student.
Taking the Test
- Students navigate through the questions by clicking the blue Next button after selecting their answers.
- For assessments with passages, Related questions are grouped on the bottom left.
- Click View Related button if viewing the test on a mobile device to read a passage.
Test Supports
IMPORTANT: Students will only see Test Supports if enabled through the Online tab of the Test Key in TEKScore –or, if they were given individual access in Student Portfolio.
Guideline
- Transparent reading guide over the words (orange/ peach color). Lock or unlock separate guidelines for passages and/or questions.
Calculator
- Calculate answers with one of three Texas Instruments calculators and/or the Desmos calculator.
Texas Instruments
Desmos
Highlighter
- Highlight text in a question, passage or answer (yellow color). Select highlighter icon and hold cursor down to select text. Click highlighter icon again to turn it off.
Dictionary
- Search for the definition of a word.
Text-to-Speech
- Listen to audio of text on the screen. Access to this support can only be given in Student Portfolio. Use the controls to play or stop audio or switch from the left and right sides of the screen.
- Click change speech settings to customize Text-To-Speech Settings.
- Click Play to test sound > Change Voice, Volume, Pitch and Rate
- Click Reset to return to default settings
Test Tools
Flag Items
- Mark questions for review. Flagged items will have a red icon in the navigation panel as well as on the final review page.
Eliminate Answer Choices
- Click the X next to an answer choice to gray out an answer.
Notepad
- Type notes for any question. Click Save. > Click the Clear button to remove a selected answer choice or to clear out eliminated (grayed out) answers.
NOTE: The testing tool icons are different than the Test Supports. They are available on all online tests and can be used by any student for each question.
Review Test
- As students navigate through a test and enter their answers, the Related and Number buttons along the bottom will highlight answered questions in blue.
- Flagged questions that were marked for review will have a small red flag icon next to the number.
- Click the green Review/End button when all answers have been entered.
- Flagged items will also appear on the review page.
- Click no response or the answer to navigate directly to a selected number for editing.
- A warning message will appear if the student has not entered an answer for an item.
- NOTE: Once an assessment has been scored, a student cannot go back and make changes to their answers or login to the test from another screen or device.
Teacher View
Manage sessions in TEKScore by clicking Responses > Online Sessions from the top navigation bar.
- Select the test from the menu on the left. The Status icons are clickable filters and will indicate the current status of each student.
- Click the Refresh button at the top for real-time updates.
- As students click the score button, the green check icon will appear next to their names. If the test has rubric-based items that need to be scored, their scores will be highlighted in red with a warning icon. Click on the Rubrics button at the top to enter scores.
- Click by the test name to view the percent scored as well as the online Test ID number.
- Search Name by a full or partial name to find students or teachers and click Find.
Click the individual icons next to a student’s name for the following:
- List – View details such as when a student signed in to a test
- Reset – Reset access so a student can sign into that test
- Delete – Delete test record so student can retake or restart a test
- Cancel – Take away a student’s access to a test
- Preview – View results from a student’s assessment
District Roles
- District Administrators/Managers can view and edit student sessions for the entire district. A district user cannot access a student session unless the user is the test key author or an assigned editor.
Author/Editor
A user can access a student session for a test key if the user:
- created the test key (author).
- was granted access to edit the test key (editor).
Campus Roles:
A Campus Administrator/Manager can edit student sessions if:
- the student has selected a teacher/class at the same campus as the user OR;
- the student has not selected a teacher/class but the student is currently enrolled at the same campus.
- A Campus User cannot access a student session unless the user is the test key author or an assigned editor.
Teachers
A teacher can edit a student session if:
- the student has selected the teacher/class for the session (coded teacher) OR;
- the student is currently enrolled in at least one of the teacher’s classes (class roster) OR;
- the teacher is the author or assigned editor of the test key.
Scoring Rubrics
- Click on Rubrics button. (this will not appear if the test did not have a rubric question).
- Select the direction you want the columns to Auto Advance and check Preview to see student’s responses as you enter the scores.
- Inside the preview screen, you can also enter scores or view how many times a student hit the return button (helpful for longer essays).
- Click in the empty box to enter Rubric Score.
- Each column will indicate the max score available per question.
- Select the student name (underlined) to view the student document and other responses.
- Click the Return icon to go back to Online Sessions page or click Print to print one or more student’s answers to the rubric questions by checking individual names or the Student box at the top of the column.
- Click Save. This will automatically rescore the student’s assessment.
Dashboards & One-Click Reports
- Once students have clicked the score button on an online assessment, teachers can open their Dashboards in TEKScore for real-time results.
- Teachers can click on the One-Click settings icon to establish which reports they would like to generate each time they click on the reports link under a test name.
- Utilize the TEKS Map in the middle of the dashboard to view performance by subject and performance. Click individual squares to drill-down. Right click to drill up.
- The larger the square, the more it was tested and the colors indicate performance with green as a higher score and red lower.
- View individual results by student by clicking the Students button to the left of the TEKS MAP in the test view.
Full Student View of Online Testing
The video above is posted as a tutorial for all students to see on the Student sign in page of DMAC.